Toyota 4Runner: Removal
REMOVAL
CAUTION / NOTICE / HINT
NOTICE:
Make sure to release the vacuum from the brake booster before removing the master cylinder from the brake booster.
PROCEDURE
1. DRAIN BRAKE FLUID
NOTICE:
Wash off brake fluid immediately if it comes in contact with any painted surface.
2. REMOVE BRAKE MASTER CYLINDER SUB-ASSEMBLY
|
(a) Disconnect the connector. |
|

(b) Using a union nut wrench, disconnect the 2 brake lines from the brake master cylinder sub-assembly.
|
(c) Remove the 2 nuts and brake master cylinder sub-assembly. NOTICE:
|
|
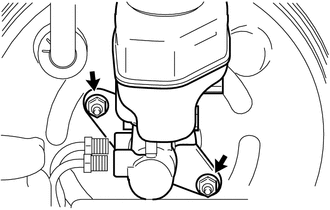
(d) Remove the O-ring from the brake master cylinder sub-assembly.
 Disassembly
DISASSEMBLY
PROCEDURE
1. REMOVE BRAKE FLUID INFORMATION LABEL
2. REMOVE BRAKE MASTER CYLINDER RESERVOIR FILLER CAP ASSEMBLY
(a) Remove the brake master cylinder reservoir filler cap assembly from ...
 Inspection
INSPECTION
CAUTION / NOTICE / HINT
NOTICE:
The master cylinder and piston are designed so that the piston can easily
fall out. Prevent this by making sure the tip of the master cylinder ...
Other materials about Toyota 4Runner:
Disposal
DISPOSAL
CAUTION / NOTICE / HINT
CAUTION:
Before performing pre-disposal deployment of any SRS part, review and closely
follow all applicable environmental and hazardous material regulations. Pre-disposal
deployment may be considered hazardous material ...
Installation
INSTALLATION
CAUTION / NOTICE / HINT
HINT:
Use the same procedure for both the RH and LH sides.
The procedure listed below is for the LH side.
PROCEDURE
1. INSTALL FRONT BUMPER BAR REINFORCEMENT LH (w/o Intuitive Parking Assist System)
...

0.0075