Toyota 4Runner: Installation
INSTALLATION
CAUTION / NOTICE / HINT
HINT:
A bolt without a torque specification is shown in the standard bolt chart (See
page .gif) ).
).
PROCEDURE
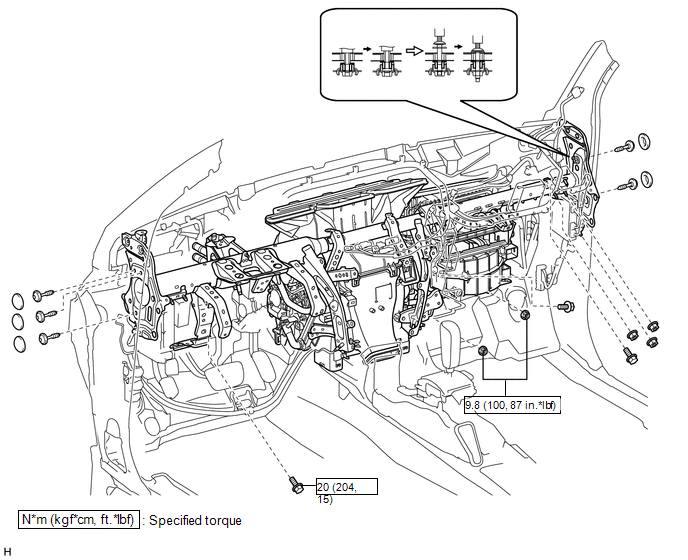
1. INSTALL INSTRUMENT PANEL REINFORCEMENT ASSEMBLY
(a) Attach the 2 claws to install the instrument panel reinforcement assembly.
(b) Install the 5 bolts.
Torque:
9.8 N·m {100 kgf·cm, 87 in·lbf}
2. INSTALL INSTRUMENT PANEL REINFORCEMENT ASSEMBLY WITH AIR CONDITIONING UNIT ASSEMBLY
(a) Install the instrument panel reinforcement assembly with air conditioning unit assembly.
(1) Install the bolts, nuts and instrument panel reinforcement assembly with air conditioning assembly.
(2) Using a 12 mm hexagon wrench, tighten the 2 collars.
(3) Using a T40 "TORX" socket, install the 5 "TORX" bolts.
Torque:
27 N·m {275 kgf·cm, 20 ft·lbf}
(4) Install the 5 caps.
(b) Attach the clamps and connect the connectors to the wire harness.
.png)
3. INSTALL NO. 1 AIR DUCT SUB-ASSEMBLY
(a) Attach the 3 claws to install the duct.
4. INSTALL NO. 2 AIR DUCT SUB-ASSEMBLY
(a) Attach the 3 claws to install the air duct.
(b) Install the screw.
5. INSTALL INSTRUMENT PANEL BRACE MOUNTING BRACKET LH
(a) Install the instrument panel brace mounting bracket LH with the 2 nuts and bolt.
6. INSTALL INSTRUMENT PANEL BRACE MOUNTING BRACKET RH
(a) Install the instrument panel brace mounting bracket RH with the 2 nuts and bolt.
7. INSTALL NO. 1 CONSOLE BOX DUCT
(a) Install the No. 1 console box duct with the clip.
8. INSTALL REAR NO. 3 AIR DUCT
(a) Attach the 3 clamps and 4 claws to install the rear No. 3 air duct.
9. INSTALL REAR NO. 1 AIR DUCT
(a) Attach the 3 clamps and 4 claws to install the rear No. 1 air duct.
10. INSTALL FRONT FLOOR CARPET ASSEMBLY
(a) Install the front floor carpet assembly.
11. INSTALL FRONT SEAT ASSEMBLY LH
(a) for Manual Seat:
Install the front seat assembly LH (See page
).
(b) for Power Seat:
Install the front seat assembly LH (See page
).
12. INSTALL FRONT SEAT ASSEMBLY RH
HINT:
Use the same procedure described for the LH side.
(a) for Manual Seat:
Install the front seat assembly RH (See page
).
(b) for Power Seat:
Install the front seat assembly RH (See page
).
13. INSTALL STEERING COLUMN ASSEMBLY
(a) Install the steering column assembly (See page
).
14. INSTALL INSTRUMENT PANEL SUB-ASSEMBLY
(a) Install the instrument panel sub-assembly (See page
).
15. INSTALL WINDSHIELD WIPER MOTOR ASSEMBLY
(a) Install the windshield wiper motor assembly (See page
).
16. CONNECT HEATER WATER INLET HOSE AND HEATER WATER OUTLET HOSE
|
(a) Connect the 2 heater water hoses. Text in Illustration
|
|

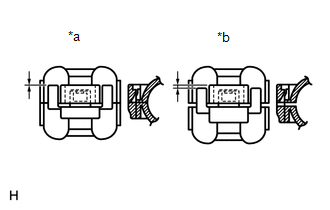
(b) Using pliers, grip the claws of the clips and slide the 2 clips.
17. CONNECT AIR CONDITIONING TUBE ASSEMBLY
.png)
(a) Install the grommet.
(b) Install the 2 new O-rings to the air conditioning tube assembly.
Compressor oil:
ND-OIL 8 or equivalent
|
(c) Connect the air conditioning tube assembly with the piping clamp. Text in Illustration
NOTICE: After connecting the tube, check that the claw of the piping clamp is attached. |
|
18. CONNECT CABLE TO NEGATIVE BATTERY TERMINAL
NOTICE:
When disconnecting the cable, some systems need to be initialized after the cable
is reconnected (See page ).
19. CHECK SRS WARNING LIGHT
(a) Check the SRS warning light (See page ).
20. ADD ENGINE COOLANT
(a) Add engine coolant (See page ).
21. CHARGE REFRIGERANT
22. WARM UP ENGINE
23. CHECK FOR ENGINE COOLANT LEAK
(a) Check for engine coolant leak (See page
).
24. CHECK FOR REFRIGERANT GAS LEAK
 Removal
REMOVAL
PROCEDURE
1. DRAIN ENGINE COOLANT
(a) Drain engine coolant (See page ).
2. RECOVER REFRIGERANT FROM REFRIGERATION SYSTEM
3. DISCONNECT CABLE FROM NEGATIVE BATTERY TERMINAL
CAUTION:
...
 Reassembly
REASSEMBLY
PROCEDURE
1. INSTALL NO. 1 COOLER THERMISTOR
NOTICE:
If reusing the evaporator, do not insert the thermistor into a location where
the thermistor was previously inserted.
(a) Inser ...
Other materials about Toyota 4Runner:
Sliding Roof ECU Communication Stop (B1273)
DESCRIPTION
This DTC is stored when LIN communication between the sliding roof ECU (sliding
roof drive gear sub-assembly) and main body ECU (multiplex network body ECU) stops
for 10 seconds or more.
DTC Code
DTC Detection Condition
...
System Description
SYSTEM DESCRIPTION
1. FRONT POWER SEAT CONTROL SYSTEM DESCRIPTION
The driver seat is equipped with slide, reclining, lifter, front vertical
and lumbar support adjustment functions.
The passenger seat is equipped with slide and reclining adjust ...
0.0088