Toyota 4Runner: Removal
REMOVAL
CAUTION / NOTICE / HINT
HINT:
- Use the same procedure for the RH and LH sides.
- The procedure listed below is for the LH side.
PROCEDURE
1. REMOVE FRONT WHEEL
2. REMOVE DISC BRAKE CYLINDER ASSEMBLY LH
.gif)
3. REMOVE FRONT DISC
4. REMOVE FRONT AXLE HUB SUB-ASSEMBLY LH
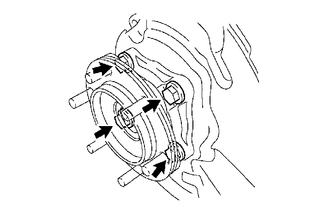
(a) Remove the 4 bolts, axle hub and disc brake dust cover from the steering knuckle.
(b) Remove the O-ring from the axle hub.
 On-vehicle Inspection
ON-VEHICLE INSPECTION
PROCEDURE
1. REMOVE FRONT WHEEL
2. REMOVE DISC BRAKE CYLINDER ASSEMBLY LH
3. REMOVE FRONT DISC
4. INSPECT FRONT AXLE HUB BEARING LOOSENESS
(a) Using a dial ...
 Disassembly
DISASSEMBLY
CAUTION / NOTICE / HINT
PROCEDURE
1. REMOVE FRONT WHEEL ADJUSTING NUT LH
(a) Using SST and a hammer, unstake the adjusting nut.
SST: 09930-00010
(b) Using SST, remove th ...
Other materials about Toyota 4Runner:
Noise Occurs
PROCEDURE
1.
NOISE CONDITION
(a) Check from which direction the noise comes (front left or right, or rear
left or right).
OK:
The location of the noise source can be determined.
NG
GO TO STEP 3
...
Pressure Control Solenoid "D" Electrical (Shift Solenoid Valve SLT) (P2716)
DESCRIPTION
Refer to DTC P2714 (See page ).
DTC Code
DTC Detection Condition
Trouble Area
P2716
Open or short is detected in the shift solenoid valve SLT circuit for
1 sec. or more while drivi ...
0.0083