Toyota 4Runner: Torque Converter Clutch And Drive Plate
Inspection
INSPECTION
PROCEDURE
1. INSPECT TORQUE CONVERTER CLUTCH ASSEMBLY
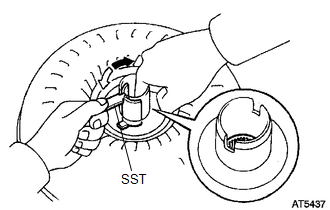
(a) Inspect the 1-way clutch.
(1) Install SST to the inner race of the 1-way clutch.
SST: 09350-32014
09351-32020
(2) Press on the serrations of the starter with a finger and rotate it.
Check if it rotates smoothly when turned clockwise and locks when turned counterclockwise.
Text in Illustration
.png) |
Free |
.png) |
Lock |
If the results are not as specified, clean the converter and recheck the 1-way clutch. If the results still are not as specified, replace the torque converter clutch assembly.
|
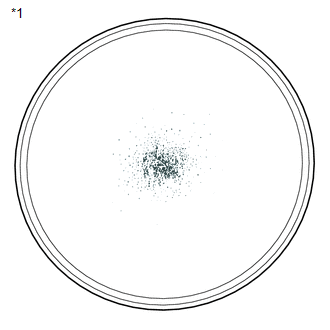
(b) Determine the condition of the torque converter clutch. Text in Illustration
(1) Check that the following conditions are met:
If the results are not as specified, replace the torque converter clutch assembly. HINT: The sample illustration shows approximately 0.025 liters (0.026 US qts, 0.022 Imp. qts) of ATF taken from a removed torque converter clutch. |
|
(c) Replace the ATF in the torque converter clutch.
(1) AT If the ATF is discolored and/or has a foul odor, stir the ATF in the torque converter clutch thoroughly and drain the ATF with the torque converter facing upward.
|
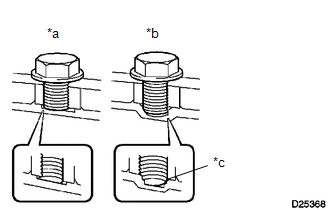
(d) Prevent deformation of the torque converter clutch and damage to the oil pump gear. Text in Illustration
(1) When any marks due to interference are found on the end of the bolt for the torque converter clutch and on the bottom of the bolt hole, replace the bolt and torque converter clutch. (2) All of the bolts should be the same length. (3) Make sure no spring washers are missing. |
|
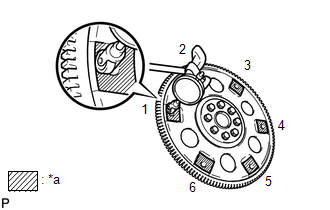
2. INSPECT DRIVE PLATE
(a) Check the drive plate for damage.
|
(b) Set up a dial indicator and measure the runout of the 6 portions around the torque converter clutch contact surfaces. Maximum runout: 0.30 mm (0.0118 in.) Text in Illustration
If the runout is more than the maximum, or the drive plate is damaged,
replace the drive plate (See page |
|
.gif) ).
).
 Speed Sensor
Components
COMPONENTS
ILLUSTRATION
Removal
REMOVAL
PROCEDURE
1. REMOVE SPEED SENSOR NT
(a) Disconnect the sensor connector.
(b) Remove the bolt and sensor.
(c) Remove the O-ring from ...
 Transmission Control Cable
Components
COMPONENTS
ILLUSTRATION
Removal
REMOVAL
PROCEDURE
1. REMOVE CONSOLE BOX ASSEMBLY
(a) Remove the console box assembly (See page
).
2. REMOVE TRANSMISSION CONTROL CABLE ASSEM ...
Other materials about Toyota 4Runner:
Removal
REMOVAL
CAUTION / NOTICE / HINT
HINT:
Use the same procedure for the RH and LH sides.
The procedure listed below is for the LH side.
PROCEDURE
1. REMOVE ROCKER PANEL MOULDING (w/ Intuitive Parking Assist System)
(See page )
2. REMOVE ...
Inspection
INSPECTION
PROCEDURE
1. INSPECT FRONT NO. 1 SUSPENSION LOWER ARM SUB-ASSEMBLY LH
(a) As shown in the illustration, flip the ball joint stud back and forth
5 times before installing the nut.
(b) Using ...
0.0087