Toyota 4Runner: Differential Oil
Replacement
REPLACEMENT
PROCEDURE
1. INSPECT DIFFERENTIAL OIL LEVEL
(a) Stop the vehicle on a level surface.
(b) Remove the differential filler plug and gasket.
|
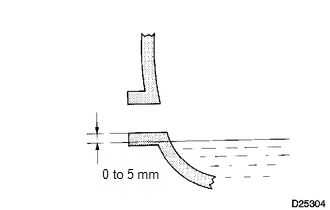
(c) Check that the oil level is within 0 to 5 mm (0 to 0.197 in.) of the bottom of the filler plug opening. NOTICE: Excessively large or small quantities of oil may cause problems. If the oil level is low, add differential oil to adjust the oil level. If the oil level is still low, check for oil leakage. If leakage is found, repair or replace the part necessary to stop the leakage. |
|
(d) Install a new gasket and differential filler plug.
Torque:
Front differential carrier :
39 N·m {398 kgf·cm, 29 ft·lbf}
Rear differential carrier :
49 N·m {500 kgf·cm, 36 ft·lbf}
2. DRAIN DIFFERENTIAL OIL
(a) Stop the vehicle on a level surface.
(b) Remove the differential drain plug and gasket.
(c) Drain the oil.
(d) Install a new gasket and the differential drain plug.
Torque:
Front differential carrier :
65 N·m {660 kgf·cm, 48 ft·lbf}
Rear differential carrier :
49 N·m {500 kgf·cm, 36 ft·lbf}
3. ADD DIFFERENTIAL OIL
(a) Remove the differential filler plug and gasket.
|
(b) Pour oil into the rear differential carrier assembly so that the oil level is within 0 to 5 mm (0 to 0.197 in.) of the bottom of the filler plug opening. NOTICE: Excessively large or small quantities of oil may cause problems. Front Differential Capacity:
Rear Differential Capacity:
|
|
(c) Install a new gasket and the differential filler plug.
Torque:
Front differential carrier :
39 N·m {398 kgf·cm, 29 ft·lbf}
Rear differential carrier :
49 N·m {500 kgf·cm, 36 ft·lbf}
(d) Drive the vehicle and check the oil level again.
If necessary, add differential oil.
 Problem Symptoms Table
PROBLEM SYMPTOMS TABLE
HINT:
Use the table below to help determine the cause of problem symptoms. If multiple
suspected areas are listed, the potential causes of the symptoms are listed in order
...
Other materials about Toyota 4Runner:
Removal
REMOVAL
CAUTION / NOTICE / HINT
HINT:
Use the same procedure for the RH and LH sides.
The procedure listed below is for the LH side.
When removing the window frame moulding, black out tape and outside
stripe, heat the vehicle body, windo ...
Rear Door Courtesy Switch
Components
COMPONENTS
ILLUSTRATION
Inspection
INSPECTION
PROCEDURE
1. INSPECT REAR DOOR COURTESY LIGHT SWITCH ASSEMBLY
(a) Measure the resistance according to the value(s) in the table below.
Standard Resistance:
...
0.0265


