Toyota 4Runner: Ejecting CDs
Ejecting a CD (type A and B)
Press
 and remove the CD.
Ejecting a CD (type C)
 To
To
select the CD to be ejected, press 
(  ) or
) or
 (
(
).
 The selected CD number is shown
on the display.
Press  and remove the CD.
Ejecting all the CDs (type C only)
Press and hold
 until you hear a beep, and then
remove the CDs.
Selecting a track
Press “∧” to move up or “∨” to move down using
 until the desired track number is
displayed.
Fast-forwarding and rewinding tracks
Type A: Press  (
(
) or  (
(
 ).
).
Type B and C: Press and hold “∧” or “∨” on
 .
.
Scanning tracks
Press
 .
.
The first ten seconds of each track will be played.
To cancel, press  again.
Press
 again when the desired track is
reached.
Selecting a CD (type C only)
Selecting a CD to play
Press  (
(
 ) or
) or
 (
(
 ).
).
Scanning loaded CDs
Press and hold
 until you hear a beep.
The first ten seconds of the first track on each CD will be played.
To cancel, press again.
Press
again when the desired CD is
reached.
Playing and pausing tracks (type B and C)
Press  .
.
Random playback
Current CD
Press  (RAND) or
 (RDM).
Songs are played in random order.
To cancel, press the button once more (type A and B), or twice more (type C).
All CDs (type C only)
Press  (RDM) twice.
Tracks on all loaded CDs are played in random order.
To cancel, press the button again.
Repeat play
Repeating a track
Press  (RPT) or
 (RPT).
To cancel, press the
button once more (type A and B), or twice more (type C).
Repeating all of the tracks on a CD (type C only)
Press  (RPT) twice.
To
cancel, press the button again.
Switching the display
Press  .
.
Each time  is pressed, the
display changes in the following order: Type A: Track no./Elapsed time ‚Üí CD
title ‚Üí Track name.
Type B and C: Track title ‚Üí Track name/Artist name ‚Üí Track name/ Elapsed time.
Display (type A only)
Up to 12 characters can be displayed at a time.
If there are 13 characters or more, pressing and holding
 for 1 second or more will display
the remaining characters.
A maximum of 24 characters can be displayed.
If  is pressed for 1 second or
more again or has not been pressed for 6 seconds or more, the display will
return to the first 12 characters.
Depending on the contents recorded, the characters may not be displayed properly or may not be displayed at all.
Error messages
“CD CHECK”: This indicates a problem either with the CD or inside the player. The CD may be dirty, damaged or inserted up-side down.
“WAIT” or “PLEASE
WAIT”: Operation has stopped due to a high temperature inside the player. Wait
for a while and then press  or
or
 . Contact your Toyota dealer if the
CD still cannot be played back.
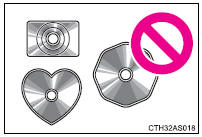
Discs that can be used
Discs with the marks shown below can be used.
Playback may not be possible depending on the recording format or disc features, or due to scratches, dirt or deterioration.

CDs with copy-protection features may not be used.
CD player protection feature
To protect the internal components, playback is automatically stopped when a problem is detected while the CD player is being used.
If CDs are left inside the CD player or in the ejected position for extended periods
CDs may be damaged and may not play properly.
Lens cleaners
Do not use lens cleaners. Doing so may damage the CD player.
NOTICE
CDs and adapters that cannot be used
Do not use the following types of CDs, 3 in. (8 cm) CD adapters or Dual Discs.
Doing so may damage the CD player and/or the CD insert/eject function.
• CD player with changer and AM/FM radio: CDs that have a diameter that is not 4.7 in. (12 cm)
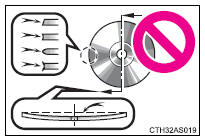
• Low-quality and deformed CDs
• CDs with a transparent or translucent recording area
• CDs that have had tape, stickers or CDR labels attached to them, or that have had the label peeled off
NOTICE
CD player precautions
Failure to follow the precautions below may result in serious damage to the CDs or the player itself.
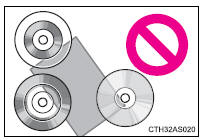
• Do not insert anything other than CDs into the CD slot.
• Do not apply oil to the CD player.
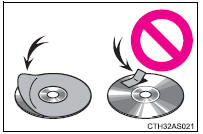
• Store CDs away from direct sunlight.
• Never try to disassemble any part of the CD player.
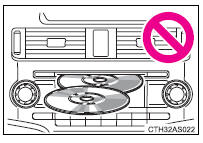
• Do not insert more than one CD at a time.
 Loading CDs
Loading a CD (type A and B)
Insert a CD.
Loading a CD (type C)
Press
.
When the indicator on the slot turns
from amber to green, insert a CD.
Loading multiple CDs (type C only)
Press ...
 Playing MP3 and WMA discs
Type A
Type B and C
Loading and ejecting MP3 and WMA discs
Selecting MP3 and WMA discs (type C only)
Selecting and scanning a folder
Selecting folders one at a time
Press “∧” or “∠...
Other materials about Toyota 4Runner:
Steering Knuckle(for 4wd)
Components
COMPONENTS
ILLUSTRATION
ILLUSTRATION
Removal
REMOVAL
CAUTION / NOTICE / HINT
HINT:
Use the same procedure for the RH and LH sides.
The procedure listed below is for the LH side.
PROCEDURE
1. DISCONNECT CABLE FROM ...
Removal
REMOVAL
PROCEDURE
1. DISCONNECT CABLE FROM NEGATIVE BATTERY TERMINAL
CAUTION:
Wait at least 90 seconds after disconnecting the cable from the negative (-)
battery terminal to disable the SRS system.
NOTICE:
When disconnecting the cable, some systems ne ...

0.0263