Toyota 4Runner: Head restraints
Head restraints are provided for all seats.
Adjusting the head restraints
Front and second seats

1. Up Pull the head restraints up.
2. Down Push the head restraint down while pushing the lock release button.
Folding the head restraints
Second seats (vehicles without third row seats)

1. To use
2. To fold
Third seats (vehicles with third row seats)

1. To use
2. To fold
Removing the head restraints (except third row seats)
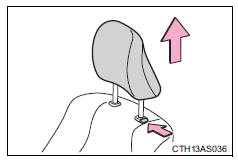
Pull the head restraint up while pressing the lock release button.
Installing the head restraints (except third row seats)
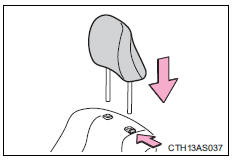
Align the head restraint with the installation holes and push it down to the lock position.
Press and hold the lock release button when lowering the head restraint.
Adjusting the height of the head restraints
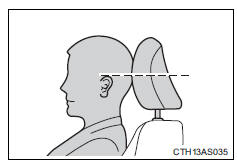
Make sure that the head restraints are adjusted so that the center of the head restraint is closest to the top of your ears.
Adjusting the second center seat head restraint
Always raise the head restraint one level from the stowed position when using.
CAUTION
Head restraint precautions
Observe the following precautions regarding the head restraints. Failure to do so may result in death or serious injury.
• Use the head restraints designed for each respective seat.
• Adjust the head restraints to the correct position at all times.
• After adjusting the head restraints, push down on them and make sure they are locked in position.
• Do not drive with the head restraints removed.
 Folding down the third row seats (vehicles with third row seats)
Before folding down the third row seats
Pass the seat belts through the seat belt hangers and secure the seat belt
plates.
This prevents the shoulder belts from being damaged.
Make sure that th ...
 Seat belts
Make sure that all occupants are wearing their seat belts before driving
the vehicle.
Correct use of the seat belts
• Extend the shoulder belt so that it comes fully over the shoulder, but doe ...
Other materials about Toyota 4Runner:
Transfer Oil
On-vehicle Inspection
ON-VEHICLE INSPECTION
PROCEDURE
1. CHECK TRANSFER OIL
(a) Remove the filler plug and gasket.
(b) Check that the oil level is between 0 to 5.0 mm (0 to 0.196 in.)
f ...
Reassembly
REASSEMBLY
CAUTION / NOTICE / HINT
HINT:
Use the same procedure for the RH and LH sides.
The procedures listed below are for the LH side.
PROCEDURE
1. INSTALL PARKING BRAKE SHOE HOLD DOWN SPRING PIN
(a) Install the parking brake shoe ho ...

0.0266