Toyota 4Runner: Installation
INSTALLATION
CAUTION / NOTICE / HINT
HINT:
- Use the same procedure for both the RH and LH sides.
- The procedure listed below is for the LH side.
PROCEDURE
1. INSTALL QUARTER WINDOW GLASS SPACER LH
|
(a) Apply Primer G to the rear quarter window assembly LH where the quarter window glass spacer LH will be installed. Standard:
NOTICE:
HINT: If the primer is applied to an area that is not specified, apply non-residue solvent to a clean cloth and wipe off the excess primer before it dries. |
|

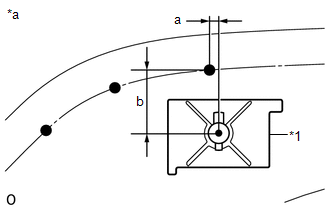
(b) Remove the peeling paper from a new quarter window glass spacer LH. Install the quarter window glass spacer LH to the rear quarter window assembly LH at the location shown in the illustration.
2. INSTALL UPPER QUARTER WINDOW GLASS RETAINER
|
(a) Apply Primer G to the rear quarter window assembly where the upper quarter window glass retainer will be installed. Standard:
NOTICE:
HINT: If the primer is applied to an area that is not specified, apply non-residue solvent to a clean cloth and wipe off the excess primer before it dries. |
|
(b) Remove the peeling paper from a new upper quarter window glass retainer. Install the upper quarter window glass retainer to the rear quarter window assembly LH at the location shown in the illustration.
3. INSTALL FRONT QUARTER WINDOW GLASS RETAINER LH
|
(a) Apply Primer G to the rear quarter window assembly LH where the front quarter window glass retainer LH will be installed. Standard:
NOTICE:
HINT: If the primer is applied to an area that is not specified, apply non-residue solvent to a clean cloth and wipe off the excess primer before it dries. |
|
(b) Remove the peeling paper from a new front quarter window glass retainer LH . Install the front quarter window glass retainer LH to the rear quarter window assembly LH at the location shown in the illustration.
4. INSTALL LOWER QUARTER WINDOW GLASS RETAINER LH
|
(a) Apply Primer G to the rear quarter window assembly LH where the lower quarter window glass retainer LH will be installed. Standard:
NOTICE:
HINT: If the primer is applied to an area that is not specified, apply non-residue solvent to a clean cloth and wipe off the excess primer before it dries. |
|
(b) Remove the peeling paper from a new lower quarter window glass retainer LH. Install the lower quarter window glass retainer LH to the rear quarter window assembly LH at the location shown in the illustration.
5. INSTALL QUARTER WINDOW GLASS SPACER
|
(a) Apply Primer G to the rear quarter window assembly LH where the quarter window glass spacer will be installed. Text in Illustration
NOTICE:
HINT: If the primer is applied to an area that is not specified, apply non-residue solvent to a clean cloth and wipe off the excess primer before it dries. |
|
(b) Remove the peeling paper from a new quarter window glass spacer. Install the quarter window glass spacer to the rear quarter window assembly LH at the location shown in the illustration.
6. INSTALL REAR QUARTER WINDOW ASSEMBLY LH
(a) Using a brush or sponge, apply Primer M to the exposed part of the vehicle body.
 Text in Illustration
|
*a |
CORRECT |
|
*b |
INCORRECT |
 |
Primer M |
.png) |
Adhesive |
NOTICE:
- Allow the primer coating to dry for 3 minutes or more.
- Throw away any leftover primer.
- Do not apply too much primer.
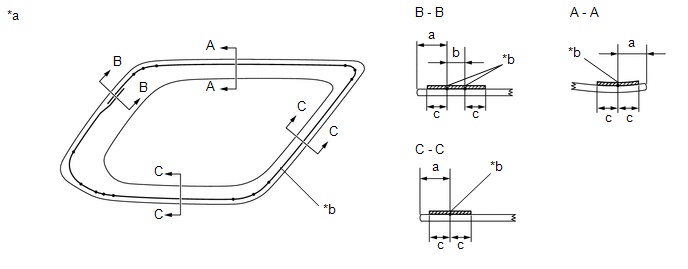
(b) Using a brush or sponge, apply Primer G to the contact surface of the rear quarter window assembly LH.
 Text in Illustration
|
*a |
Backside |
*b |
Adhesive Center Line |
|
|
Primer G |
- |
- |
Standard:
|
Area |
Specified Condition |
|---|---|
|
a |
13.5 mm (0.531 in.) |
|
b |
8.0 mm (0.315 in.) |
|
c |
10.0 mm (0.394 in.) |
NOTICE:
- Allow the primer to dry for 3 minutes or more.
- Throw away any leftover primer.
- Do not apply too much primer.
HINT:
If primer is applied to an area that is not specified, wipe off the primer with non-residue solvent before it dries.
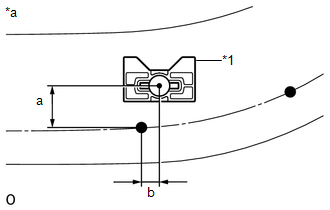
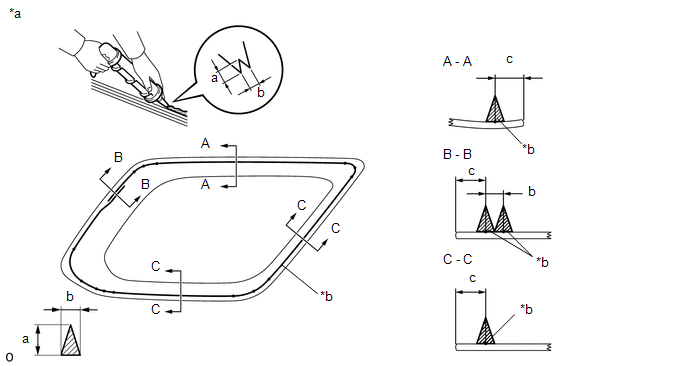
(c) Apply adhesive to the rear quarter window assembly LH.
Adhesive:
Toyota Genuine Windshield Glass Adhesive or equivalent
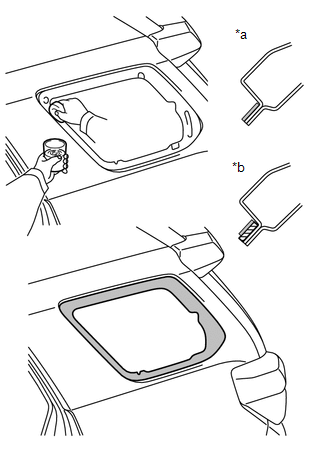
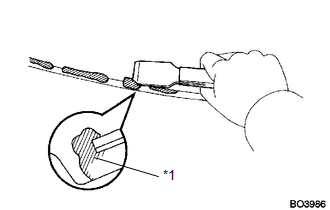
(1) Cut off the tip of a cartridge nozzle as shown in the illustration.
 Text in Illustration
|
*a |
Backside |
*b |
Adhesive Center Line |
|
|
Adhesive |
- |
- |
Standard:
|
Area |
Specified Condition |
|---|---|
|
a |
12.0 mm (0.472 in.) |
|
b |
8.0 mm (0.315 in.) |
|
c |
13.5 mm (0.531 in.) |
HINT:
After cutting off the tip, use all adhesive within the time written in the table below.
Usage Time Frame:
|
Temperature |
Usage Time Frame |
|---|---|
|
35°C (95°F) |
15 minutes |
|
20°C (68°F) |
1 hour 40 minutes |
|
5°C (41°F) |
8 hours |
(2) Load a sealer gun with the cartridge.
(3) Apply adhesive to the rear quarter window assembly LH as shown in the illustration.
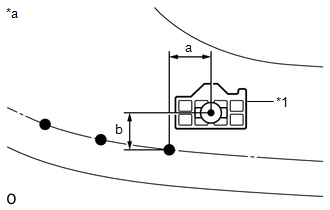
(d) Install the rear quarter window assembly LH to the vehicle body.
(1) Attach the 3 retainers and 2 spacers to install the rear quarter window assembly LH.
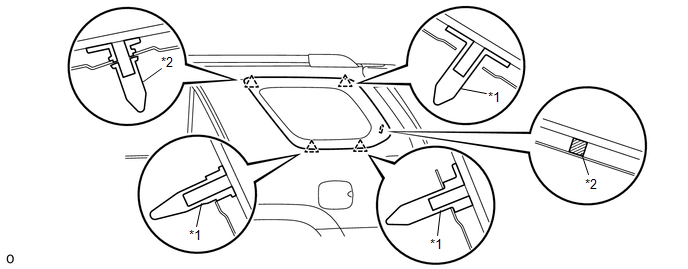 Text in Illustration
|
*1 |
Retainer |
*2 |
Spacer |
NOTICE:
Allow the primer to dry for 3 minutes or more.
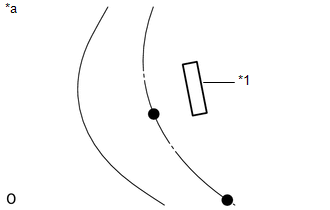
(2) Hold the rear quarter window assembly LH in place securely with protective tape or equivalent until the adhesive hardens.
NOTICE:
- Allow the primer coating to dry for 3 minutes or more.
- Check the clearance between the body and glass.
(3) Lightly press the front surface of the glass to ensure a close fit.
|
(4) Using a scraper, remove any excess or protruding adhesive. Text in Illustration
NOTICE: Do not drive the vehicle within the time written in the table below. Minimum Time:
|
|
7. CONNECT WINDOW GLASS ANTENNA WIRE
(a) Connect the window glass antenna connector (for LH side).
(b) Connect the window glass antenna connector (for RH side).
8. CHECK FOR LEAK AND REPAIR
(a) Conduct a leak test after the adhesive has completely hardened.
(b) Seal any leaks with auto glass sealer.
9. INSTALL ROOF SIDE RAIL GARNISH ASSEMBLY LH
|
(a) Install a new 3 clips to the roof side rail garnish assembly LH. Text in Illustration
|
|
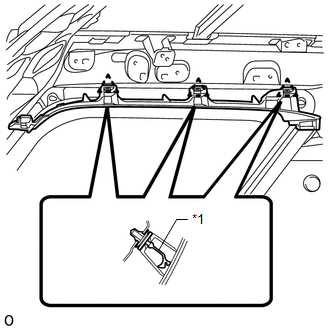
(b) Attach the 3 clips to install the roof side rail garnish assembly LH.
10. INSTALL ROOF HEADLINING ASSEMBLY
(See page .gif) )
)
 Removal
REMOVAL
CAUTION / NOTICE / HINT
HINT:
Use the same procedure for both the RH and LH sides.
The procedure listed below is for the LH side.
PROCEDURE
1. REMOVE ROOF HEADLINING ASS ...
 Rear Power Window Switch
Components
COMPONENTS
ILLUSTRATION
Inspection
INSPECTION
PROCEDURE
1. INSPECT REAR POWER WINDOW REGULATOR SWITCH ASSEMBLY
(a) Measure the resistance according to the value(s) i ...
Other materials about Toyota 4Runner:
Open in ABS Solenoid Relay Circuit (C0278,C0279)
DESCRIPTION
The solenoid relay is built into the master cylinder solenoid.
This relay supplies power to each solenoid. If the initial check is OK, after
the ignition switch is turned to ON, the relay turns on.
DTC Code
DTC Detection ...
How To Proceed With Troubleshooting
CAUTION / NOTICE / HINT
HINT:
Use these procedures to troubleshoot the lighting system.
*: Use the Techstream.
PROCEDURE
1.
VEHICLE BROUGHT TO WORKSHOP
NEXT
...

0.009