Toyota 4Runner: Installation
INSTALLATION
CAUTION / NOTICE / HINT
CAUTION:
Wear protective gloves. Sharp areas on the parts may injure your hands.
PROCEDURE
1. INSTALL REAR SEAT ASSEMBLY RH
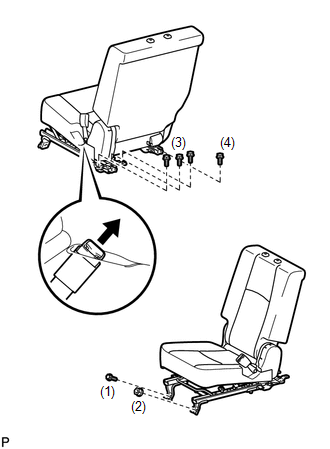
(a) Place the seat in the cabin.
NOTICE:
Be careful not to damage the vehicle body.
HINT:
Be sure to install the seat with the seatback folded down.
(b) Connect the center inner belt to the seat.
(c) Temporarily install the seat with the 5 bolts and nut.
(d) Tighten the bolts and nut in the order indicated in the illustration.
Torque:
37 N·m {377 kgf·cm, 27 ft·lbf}
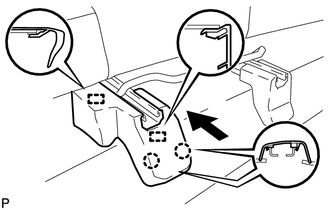
2. INSTALL REAR SEAT TRACK COVER RH
(a) Attach the 5 clips and claw to install the cover.
3. INSTALL SEAT TRACK INNER BRACKET COVER RH
(a) Attach the 8 clips to install the cover.
4. INSTALL REAR SEAT TRACK OUTER BRACKET COVER
(a) Move the cover in the direction of the arrow to attach the 2 guides.
(b) Attach the 2 claws to install the cover.
5. INSTALL REAR SEAT TRACK INNER BRACKET COVER
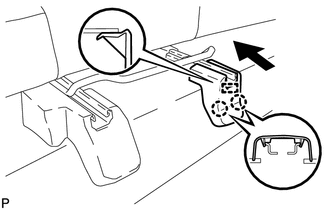
(a) Attach the 2 claws and guide to install the cover.
6. INSTALL REAR SEAT HEADREST ASSEMBLY
(a) Install the headrest.
 Reassembly
REASSEMBLY
CAUTION / NOTICE / HINT
CAUTION:
Wear protective gloves. Sharp areas on the parts may injure your hands.
HINT:
A bolt without a torque specification is shown in the standard bolt chart ...

Other materials about Toyota 4Runner:
No Answer-Back
DESCRIPTION
In some cases, the wireless door lock control functions are normal but the hazard
warning light and/or wireless door lock buzzer answer-back function(s) does not
operate. In such cases, hazard warning light and wireless door lock buzzer signal ...
Differential Oil
Replacement
REPLACEMENT
PROCEDURE
1. INSPECT DIFFERENTIAL OIL LEVEL
(a) Stop the vehicle on a level surface.
(b) Remove the differential filler plug and gasket.
(c) Check that the oil level is within 0 to 5 mm (0 to 0.197 in.) of
the bot ...

0.0185