
Toyota 4Runner: License Plate Light Assembly
Components
COMPONENTS
ILLUSTRATION
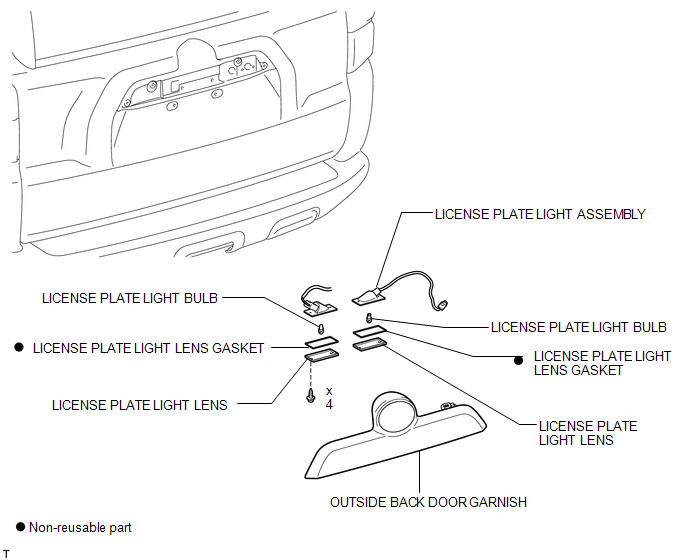
Removal
REMOVAL
PROCEDURE
1. REMOVE OUTSIDE BACK DOOR GARNISH
(a) Remove the outside back door garnish (See page
.gif) ).
).
2. REMOVE LICENSE PLATE LIGHT ASSEMBLY
|
(a) Remove the 4 screws and light. |
|
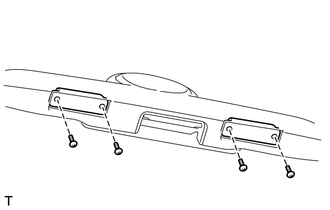
3. REMOVE LICENSE PLATE LIGHT LENS
(a) Remove the lens.
4. REMOVE LICENSE PLATE LIGHT LENS GASKET
(a) Remove the gasket.
5. REMOVE LICENSE PLATE LIGHT BULB
(a) Remove the bulb.
Installation
INSTALLATION
PROCEDURE
1. INSTALL LICENSE PLATE LIGHT BULB
(a) Install the bulb.
2. INSTALL LICENSE PLATE LIGHT LENS GASKET
(a) Install a new gasket.
3. INSTALL LICENSE PLATE LIGHT LENS
(a) Install the lens.
4. INSTALL LICENSE PLATE LIGHT ASSEMBLY
(a) Install the light with the 4 screws.
5. INSTALL OUTSIDE BACK DOOR GARNISH
(a) Install the outside back door garnish (See page
.gif) ).
).
 High Mounted Stop Light Assembly
Components
COMPONENTS
ILLUSTRATION
Removal
REMOVAL
PROCEDURE
1. REMOVE CENTER STOP LIGHT ASSEMBLY
(a) Remove the 2 screws and stop light.
...
 Lighting System
...
Other materials about Toyota 4Runner:
Cursor or Map Rotates when Vehicle Stopped
PROCEDURE
1.
CHECK CONDITION
(a) Check with the customer if the vehicle has been turned by a turntable.
OK:
Vehicle has not been turned by a turntable.
HINT:
If the vehicle is turned on a turntable with ...
Accumulator Low Pressure (C1256)
DESCRIPTION
Refer to DTC C1254 (See page ).
DTC Code
DTC Detection Condition
Trouble Area
C1256
The fluid pressure inside the accumulator is below the standard value.
Brake b ...

0.0112