Toyota 4Runner: Outside rear view mirrors
Mirror angle can be adjusted using the switch.
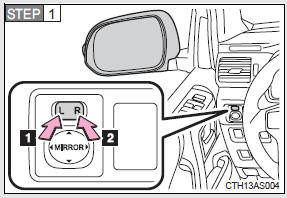
To select a mirror to adjust, press the switch.
1. Left
2. Right
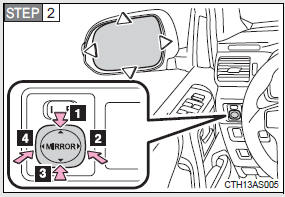
To adjust the mirror, press the switch.
1. Up
2. Right
3. Down
4. Left
Folding the mirrors
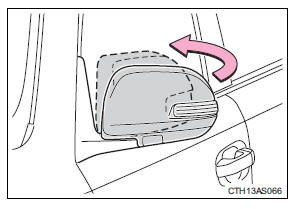
Push the mirror back in the direction of the vehicle's rear.
Mirror angle can be adjusted when
Vehicles without a smart key system
The engine switch is in the “ACC” or “ON” position.
Vehicles with a smart key system
The “ENGINE START STOP” switch is in ACCESSORY or IGNITION ON mode.
When the mirrors are fogged up
Turn on the mirror defoggers to defog the mirrors.
CAUTION
When driving the vehicle
Observe the following precautions while driving.
Failure to do so may result in loss of control of the vehicle and cause an accident, resulting in death or serious injury.
• Do not adjust the mirrors while driving.
• Do not drive with the mirrors folded.
• Both the driver and passenger side mirrors must be extended and properly adjusted before driving.
When a mirror is moving
To avoid personal injury and mirror malfunction, be careful not to get your hand caught by the moving mirror.
When the mirror defoggers are operating
Do not touch the rear view mirror surfaces, as they can become very hot and burn you.
 Inside rear view mirror
Glare from the headlights of vehicles behind can be reduced by using the
following functions:
Manual anti-glare inside rear view mirror
1. Normal position
2. Anti-glare position
Auto anti-gla ...

Other materials about Toyota 4Runner:
Steering Lock Position Signal Circuit Malfunction (B2285)
DESCRIPTION
The power management control ECU and steering lock actuator (steering lock ECU)
are connected by a cable and the LIN communication line. This DTC is stored when
the steering lock position signal information from the cable and the steering lock ...
Terminals Of Ecu
TERMINALS OF ECU
1. TERMINALS OF ECU
Text in Illustration
*a
Component without harness connected
(Skid Control ECU)
-
-
Terminal No. (Symbol)
Terminal Description
...

0.0164