Toyota 4Runner: Reassembly
REASSEMBLY
CAUTION / NOTICE / HINT
CAUTION:
Wear protective gloves. Sharp areas on the parts may injure your hands.
PROCEDURE
1. INSTALL FRONT SEAT SIDE AIRBAG ASSEMBLY
.gif)
2. INSTALL SEPARATE TYPE FRONT SEATBACK COVER
|
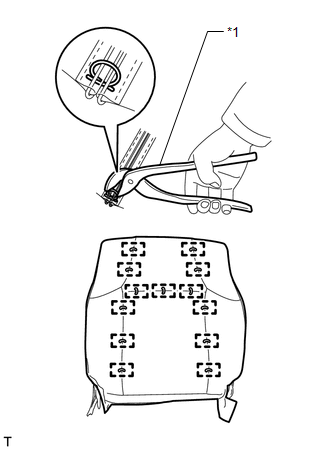
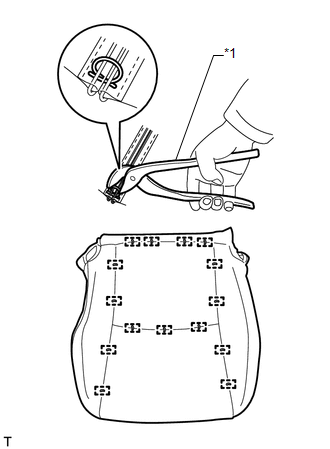
(a) Using hog ring pliers, install the separate type front seatback cover to the separate type front seatback pad with 13 new hog rings. Text in Illustration
NOTICE:
|
|
|
(b) Connect the seatback cover bracket to the separate type front seatback pad. |
|
3. INSTALL SEATBACK COVER WITH PAD
(a) Install the seatback cover with pad to the separate type front seatback spring assembly.
(b) Attach the 4 claws to install the 2 front seat headrest supports.
(c) Attach the 2 hooks and connect the seatback cover bracket to the separate type front seatback spring assembly with the nut.
Torque:
5.5 N·m {56 kgf·cm, 49 in·lbf}
NOTICE:
After the seatback cover bracket is attached, make sure the seatback cover bracket is not twisted.
|
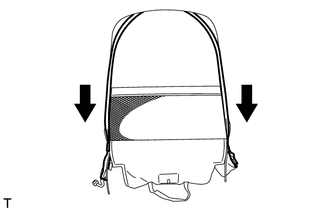
(d) Close the 2 fasteners and separate type front seatback cover. |
|
|
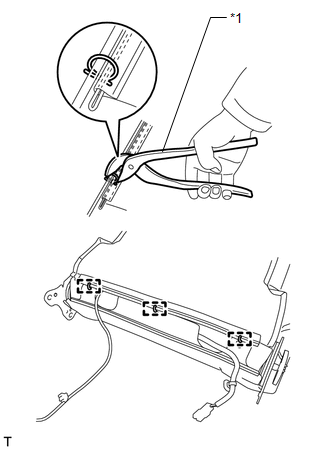
(e) Using hog ring pliers, install new 3 hog rings. Text in Illustration
NOTICE:
|
|
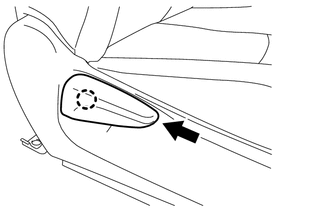
4. INSTALL RECLINING ADJUSTER INSIDE COVER LH
|
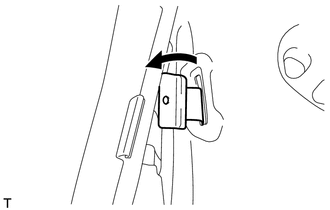
(a) Move the reclining adjuster inside cover LH in the direction of the arrow to install the reclining adjuster inside cover LH. |
|
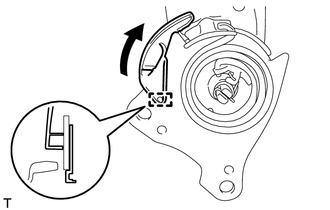
(b) Attach the guide.
5. INSTALL RECLINING ADJUSTER INSIDE COVER RH
HINT:
Use the same procedure described for the LH side.
6. INSTALL FRONT SEAT WIRE RH
(a) Install the front seat wire RH.
7. INSTALL OCCUPANT CLASSIFICATION ECU
(a) Attach the claw to install the occupant classification ECU.
(b) Connect the 2 connectors.
8. INSTALL FRONT SEAT CUSHION EDGE PROTECTOR RH
|
(a) Move the front seat cushion edge protector RH in the direction of the arrow to attach the hook and install the front seat cushion edge protector RH. |
|
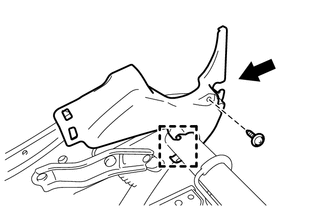
(b) Install the screw.
9. INSTALL FRONT SEAT CUSHION EDGE PROTECTOR LH
HINT:
Use the same procedure described for the RH side.
10. INSTALL RECLINING ADJUSTER INSIDE COVER RH
(a) Attach the claw and guide to install the reclining adjuster inside cover RH.
11. INSTALL SEPARATE TYPE FRONT SEAT CUSHION COVER
|
(a) Using hog ring pliers, install the separate type front seat cushion cover to the separate type front seat cushion pad with 15 new hog rings. Text in Illustration
NOTICE:
|
|
12. INSTALL SEAT CUSHION COVER WITH PAD
(a) Attach each hook to install the seat cushion cover with pad to the separate type front seat cushion spring assembly.
13. INSTALL FRONT SEAT LEG COVER RH
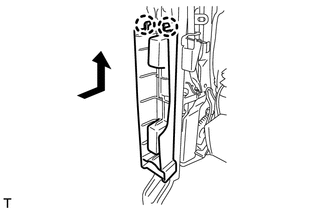
(a) Move the front seat leg cover RH in the direction of the arrow to install the front seat leg cover RH.
(b) Attach the 2 claws.
14. INSTALL SEAT TRACK ADJUSTING HANDLE
(a) Engage the 2 springs to install the seat track adjusting handle to the separate type front seat cushion spring assembly.
15. INSTALL SEPARATE TYPE FRONT SEATBACK ASSEMBLY
(a) Install the separate type front seatback assembly with the 4 bolts.
Torque:
42 N·m {428 kgf·cm, 31 ft·lbf}
(b) Attach the fastening tape to connect the airbag wire harness.
(c) Attach the 3 airbag wire harness clamps.
(d) Attach the claw to connect the airbag connector.
(e) Attach the 2 hooks.
(f) Install the 2 clips.
(g) Install the rubber band to the separate type front seat cushion spring assembly.
16. INSTALL FRONT SEAT INNER BELT ASSEMBLY RH
17. INSTALL FRONT SEAT INNER CUSHION SHIELD RH
(a) Attach the 4 claws to install the front seat inner cushion shield RH.
18. INSTALL FRONT SEAT CUSHION SHIELD RH
(a) Attach the 4 claws and clip to install the front seat cushion shield RH.
(b) Install the screw.
19. INSTALL RECLINING ADJUSTER RELEASE HANDLE RH
(a) Attach the claw to install the reclining adjuster release handle RH.
20. INSTALL SEAT ADJUSTER COVER CAP
(a) Install the 2 seat adjuster cover caps.
 Installation
INSTALLATION
CAUTION / NOTICE / HINT
CAUTION:
Wear protective gloves. Sharp areas on the parts may injure your hands.
HINT:
The procedure listed below is for the RH side.
PROCEDURE
1. INSTALL F ...

Other materials about Toyota 4Runner:
Accumulator Solenoid Malfunction / Upside (C1831/31,C1832/32)
DESCRIPTION
The stabilizer control ECU receives information from the steering angle sensor,
skid control ECU (speed signal) and yaw rate and acceleration sensor via CAN communication.
Based on this information, the stabilizer control ECU turns the stabili ...
Window Defogger Wire
On-vehicle Inspection
ON-VEHICLE INSPECTION
PROCEDURE
1. INSPECT BACK WINDOW GLASS (DEFOGGER WIRE)
NOTICE:
When cleaning the glass, wipe the glass along the wire using a soft,
dry cloth. Take care not to damage the defogger wires.
Do not ...

0.0109