Toyota 4Runner: Relay
On-vehicle Inspection
ON-VEHICLE INSPECTION
PROCEDURE
1. REMOVE HEADLIGHT RELAY
|
(a) Remove the headlight relay from the engine room relay box. |
|
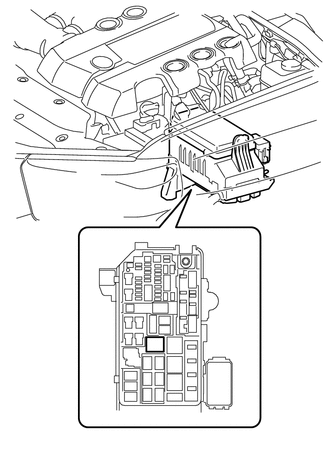
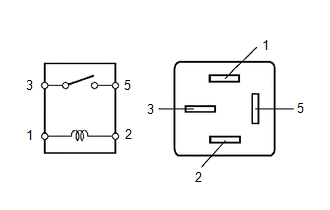
2. INSPECT HEADLIGHT RELAY
|
(a) Measure the resistance according to the value(s) in the table below. Standard Resistance:
If the result is not as specified, replace the headlight relay. |
|
3. INSTALL HEADLIGHT RELAY
(a) Install the headlight relay to the engine room relay box.
 Rear Combination Light Assembly
Components
COMPONENTS
ILLUSTRATION
Removal
REMOVAL
CAUTION / NOTICE / HINT
HINT:
Use the same procedure for both the RH and LH sides.
The procedure listed below is for the LH ...
 Side Turn Signal Light Assembly
Components
COMPONENTS
ILLUSTRATION
Removal
REMOVAL
CAUTION / NOTICE / HINT
HINT:
Use the same procedure for both the RH and LH sides.
The procedure listed below is for the LH ...
Other materials about Toyota 4Runner:
System Description
SYSTEM DESCRIPTION
1. TOUCH SWITCH OUTLINE
Touch switches are touch-sensitive (interactive) switches operated by touching
the screen. When a switch is pressed, the outer film bends in to contact the inner
glass at the pressed position. By doing this, the ...
Disassembly
DISASSEMBLY
PROCEDURE
1. REMOVE BACK DOOR OPENER SWITCH ASSEMBLY
2. REMOVE NO. 2 BACK DOOR OUTSIDE GARNISH
(a) Detach the 2 clips and No. 2 back door outside garnish.
3. REMOVE LICENSE PLATE LIGHT ASSEMBLY
4. REMOVE BACK DOOR OUTSIDE GARNISH SEAL ...

0.0081