Toyota 4Runner: Removal
REMOVAL
CAUTION / NOTICE / HINT
HINT:
- Use the same procedure for the RH and LH sides.
- The procedure listed below is for the LH side.
PROCEDURE
1. REMOVE FRONT WHEEL
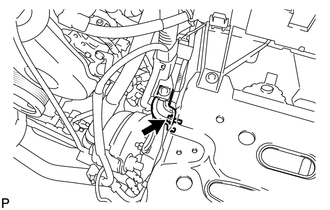
2. REMOVE SKID CONTROL SENSOR WIRE
.gif)
3. REMOVE FRONT SUSPENSION UPPER ARM ASSEMBLY LH
|
(a) Support the front suspension lower arm LH with a jack. |
|
(b) Remove the clip and nut.
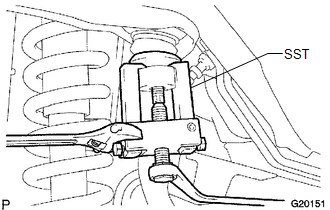
(c) Using SST, disconnect the upper ball joint from the steering knuckle.
SST: 09628-62011
|
(d) Remove the bolt and disconnect the bracket. |
|
|
(e) Remove the bolt, 2 washers and nut. |
|
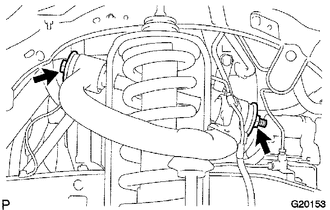
(f) Remove the front suspension upper arm assembly.
 Disassembly
DISASSEMBLY
PROCEDURE
1. REMOVE FRONT SUSPENSION UPPER ARM BUSH LH
HINT:
Use the same procedure for the front and rear sides.
(a) Using a hammer and chisel, strike and bend the entire ...
 Inspection
INSPECTION
PROCEDURE
1. INSPECT FRONT SUSPENSION UPPER ARM ASSEMBLY LH
(a) As shown in the illustration, flip the ball joint stud back and forth
5 times before installing the nut.
...
Other materials about Toyota 4Runner:
Back Door Power Window ECU Inner Motor Failure (B2311)
DESCRIPTION
The power window regulator motor is operated by the back door power window regulator
switch. The back power window regulator motor assembly has motor and ECU functions.
This DTC is stored when the back door power window regulator motor assembly ...
Terminals Of Ecu
TERMINALS OF ECU
1. CHECK DRIVER SIDE JUNCTION BLOCK ASSEMBLY, MAIN BODY ECU (MULTIPLEX NETWORK
BODY ECU)
(a) Remove the main body ECU (See page ).
(b) Measure the resistance and voltage according to the value(s) in the table
below.
Termi ...

0.0185