Toyota 4Runner: Removal
REMOVAL
CAUTION / NOTICE / HINT
HINT:
When removing the symbol emblem, No. 1 back door emblem and No. 1 roof side mark, heat the vehicle body, symbol emblem, No. 1 back door emblem and No. 1 roof side mark using a heat light.
Standard:
|
Item |
Temperature |
|---|---|
|
Vehicle Body |
40 to 60°C (104 to 140°F) |
|
Symbol Emblem |
20 to 30°C (68 to 86°F) |
|
No. 1 Back Door Emblem |
20 to 30°C (68 to 86°F) |
|
No. 1 Roof Side Mark |
20 to 30°C (68 to 86°F) |
NOTICE:
Do not heat the vehicle body, symbol emblem, No. 1 back door emblem or No. 1 roof side mark excessively.
PROCEDURE
1. REMOVE SYMBOL EMBLEM
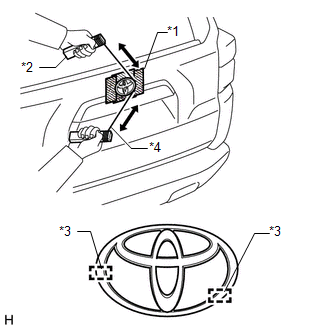
(a) Put protective tape around the symbol emblem.
Text in Illustration|
*1 |
Protective Tape |
|
*2 |
Wooden Block |
|
*3 |
Boss |
|
*4 |
Piano Wire |
(b) Insert piano wire between the vehicle body and symbol emblem.
HINT:
Be careful of the boss positions.
(c) Tie objects that can serve as handles (for example, wooden blocks) to the piano wire ends.
(d) Pull the piano wire and scrape off the double-sided tape that holds the symbol emblem to the vehicle body.
NOTICE:
Be careful not to damage the vehicle body.
(e) Remove the symbol emblem.
2. REMOVE NO. 1 BACK DOOR EMBLEM
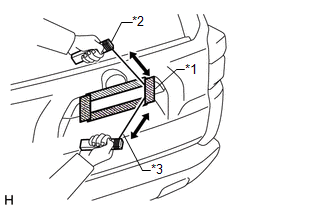
(a) Put protective tape around the No. 1 back door emblem.
Text in Illustration|
*1 |
Protective Tape |
|
*2 |
Wooden Block |
|
*3 |
Piano Wire |
(b) Insert piano wire between the vehicle body and No. 1 back door emblem.
(c) Tie objects that can serve as handles (for example, wooden blocks) to the piano wire ends.
(d) Pull the piano wire and scrape off the double-sided tape that holds the No. 1 back door emblem to the vehicle body.
NOTICE:
Be careful not to damage the vehicle body.
(e) Remove the No. 1 back door emblem.
3. REMOVE NO. 1 ROOF SIDE MARK

(a) Put protective tape around the No. 1 roof side mark.
Text in Illustration|
*1 |
Protective Tape |
|
*2 |
Wooden Block |
|
*3 |
Piano Wire |
(b) Insert piano wire between the vehicle body and No. 1 roof side mark.
(c) Tie objects that can serve as handles (for example, wooden blocks) to the piano wire ends.
(d) Pull the piano wire and scrape off the double-sided tape that holds the No. 1 roof side mark to the vehicle body.
NOTICE:
Be careful not to damage the vehicle body.
(e) Remove the No. 1 roof side mark.
 Installation
INSTALLATION
CAUTION / NOTICE / HINT
HINT:
When installing the symbol emblem, No. 1 back door emblem and No. 1 roof side
mark, heat the vehicle body, symbol emblem, No. 1 back door emblem and No. ...
 Radiator Grille
Components
COMPONENTS
ILLUSTRATION
Removal
REMOVAL
PROCEDURE
1. REMOVE UPPER RADIATOR SUPPORT SEAL
2. REMOVE FRONT BUMPER COVER
3. REMOVE FRONT BUMPER COVER (w/ Intuitive Parking A ...
Other materials about Toyota 4Runner:
Installation
INSTALLATION
PROCEDURE
1. INSTALL WIPER MOTOR WIRE
(a) Attach the claw to install the wiper motor wire.
2. INSTALL WINDSHIELD WIPER MOTOR ASSEMBLY
(a) Using a T30 "TORX" socket, install the wiper motor with the 2 bolts.
Torque:
7.5 N·m {76 k ...
Outside temperature display
The temperature display shows temperatures within the ranges of -40°F
(-40°C) and 122°F (50°C).
Vehicles without Multi-terrain Select
Vehicles with Multi-terrain Select
The outside temperature is displayed when Vehicles without a smart
key syste ...

0.0077