Toyota 4Runner: Removal
REMOVAL
CAUTION / NOTICE / HINT
CAUTION:
Wear protective gloves. Sharp areas on the parts may injure your hands.
PROCEDURE
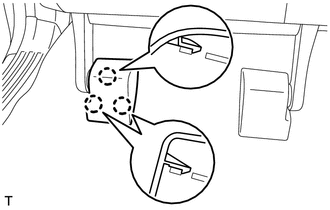
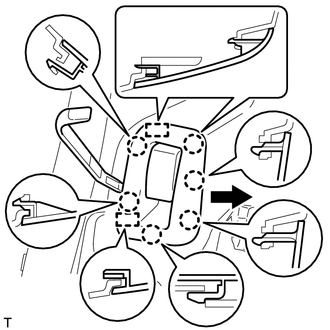
1. REMOVE REAR SEAT CUSHION HINGE COVER
(a) Using a moulding remover, detach the 3 claws and remove the cover.
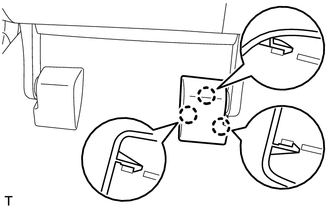
2. REMOVE REAR SEAT CUSHION HINGE COVER RH
(a) Using a moulding remover, detach the 3 claws and remove the cover.
3. REMOVE REAR SEAT CUSHION ASSEMBLY RH
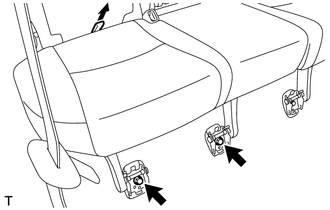
(a) Pull the rear seat cushion band and release the lock.
(b) Remove the 2 bolts and seat cushion.
NOTICE:
Be careful not to damage the vehicle body.
4. REMOVE REAR SEAT HEADREST ASSEMBLY
(a) Remove the headrest.
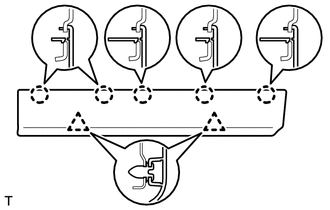
5. REMOVE REAR SEATBACK COVER
(a) Press the seatback lock release button to release the lock and fold down the seatback.
|
(b) Using a screwdriver, detach the 4 claws and remove the cover. HINT: Tape the screwdriver tip before use. |
|
.png)
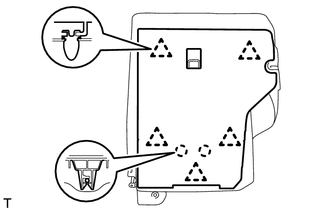
6. REMOVE REAR SEATBACK BOARD CARPET ASSEMBLY RH
(a) for Plastic Seatback Board:
|
(1) Detach the 5 claws and 2 clips, and then remove the carpet. |
|
|
(2) Using a clip remover, detach the 4 clips and remove the carpet. |
|
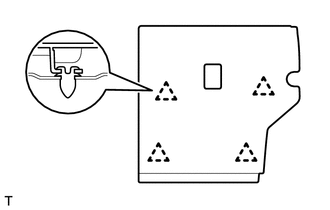
|
(b) for Seatback Board with Carpet: (1) Using a clip remover, detach the 5 clips. (2) Detach the 2 claws and remove the carpet. |
|
7. REMOVE REAR SEATBACK ASSEMBLY RH
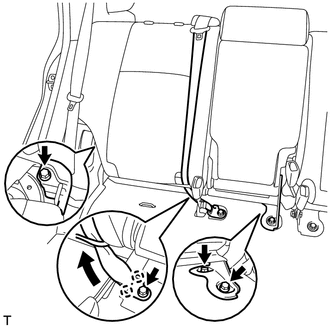
(a) Remove the bolt and detach the 2 claws, and then disconnect the outer belt.
(b) Remove the 2 bolts that secure the seatback to the floor.
(c) Fold down the seatback, remove the bolt from the hinge, and then remove the seatback.
NOTICE:
Be careful not to damage the vehicle body.
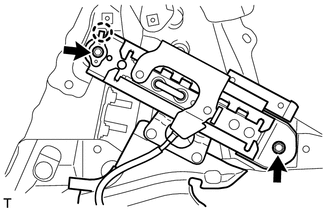
8. REMOVE REAR SEATBACK HINGE SUB-ASSEMBLY RH
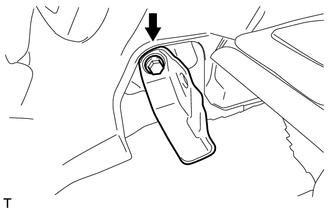
(a) Remove the bolt and hinge.
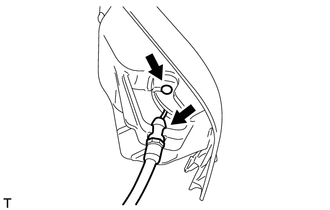
9. REMOVE REAR SEATBACK LOCK CONTROL LEVER BASE RH
(a) Using a moulding remover, detach the 6 claws.
(b) Move the cover in the direction of the arrow to detach the 2 guides and remove the lever base.
|
(c) Detach the cable clamp and disconnect the cable. |
|
10. REMOVE REAR DOOR SCUFF PLATE RH
.gif)
11. REMOVE REAR DOOR OPENING TRIM WEATHERSTRIP RH
12. REMOVE NO. 1 LUGGAGE COMPARTMENT TRIM COVER (w/o Deck Board)
13. REMOVE NO. 1 DECK BOARD SUB-ASSEMBLY (w/o Deck Board)
14. REMOVE NO. 2 LUGGAGE COMPARTMENT TRIM COVER (w/ Deck Board, w/o Rear No. 2 Seat)
15. REMOVE NO. 2 DECK BOARD SUB-ASSEMBLY (w/ Deck Board)
16. REMOVE REAR NO. 2 FLOOR BOARD ASSEMBLY (w/ Deck Board)
17. REMOVE LUGGAGE COMPARTMENT SIDE COVER SUB-ASSEMBLY LH (w/ Deck Board)
18. REMOVE LUGGAGE COMPARTMENT SIDE COVER SUB-ASSEMBLY RH (w/ Deck Board)
19. REMOVE DECK BOARD ASSEMBLY (w/ Deck Board)
20. REMOVE INNER FLOOR SIDE RAIL SUB-ASSEMBLY
21. REMOVE REAR FLOOR MAT REAR SUPPORT PLATE
22. REMOVE REAR FLOOR CARPET ASSEMBLY (w/o Deck Board)
23. REMOVE REAR NO. 1 SEAT OUTER LAP BELT ANCHOR COVER
24. REMOVE NO. 1 LUGGAGE COMPARTMENT TRIM HOOK
25. REMOVE FRONT DECK SIDE TRIM COVER RH
26. REMOVE NO. 1 LUGGAGE COMPARTMENT TRIM COVER
27. REMOVE DECK TRIM SIDE PANEL ASSEMBLY RH
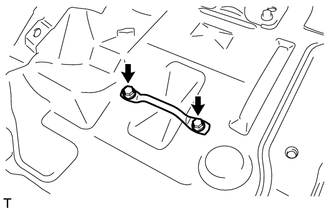
28. REMOVE REAR NO. 2 SEATBACK LOCK STRIKER SUB-ASSEMBLY RH
(a) Remove the 2 bolts.
(b) Detach the claw and remove the striker.
NOTICE:
Do not wipe off the grease on the sliding portion of the striker.
29. REMOVE REAR SEAT CUSHION LOCK STRIKER
(a) Remove the 2 bolts and striker.
 Components
COMPONENTS
ILLUSTRATION
ILLUSTRATION
ILLUSTRATION
ILLUSTRATION
ILLUSTRATION
ILLUSTRATION
ILLUSTRATION
ILLUSTRATION
ILLUSTRATION
ILLUSTRATION
...
 Installation
INSTALLATION
CAUTION / NOTICE / HINT
CAUTION:
Wear protective gloves. Sharp areas on the parts may injure your hands.
HINT:
A bolt without a torque specification is shown in the standard bolt cha ...
Other materials about Toyota 4Runner:
Short in Motor LH (11,12)
DESCRIPTION
When there is a short in the side auto step motor circuit, the side auto step
controller ECU assembly halts the operation of the automatic running board.
DTC No.
Detection Condition
Trouble Area
...
Rear Window Defogger System does not Operate
DESCRIPTION
When the back door power window is fully closed and the rear window defogger
switch is turned on, a rear window defogger activation request signal is sent via
the LIN communication line to the air conditioning amplifier.
WIRING DIAGRAM
CAU ...

0.0275