Toyota 4Runner: Removal
REMOVAL
CAUTION / NOTICE / HINT
CAUTION:
Wear protective gloves. Sharp areas on the parts may injure your hands.
HINT:
- Use the same procedure for the power seat RH and power seat LH sides.
- The procedure listed below is for the power seat LH side.
PROCEDURE
1. PRECAUTION
CAUTION:
- Be sure to read Precaution thoroughly before servicing (See page
.gif) ).
). - If the side airbag was deployed, replace the separate type front seatback assembly with the necessary parts in accordance with the extent of the collision damage.
2. REMOVE FRONT SEAT ASSEMBLY (for Manual Seat Type RH Side)
(See page )
3. REMOVE FRONT SEAT ASSEMBLY (for Power Seat)
(See page )
4. REMOVE FRONT SEATBACK BOARD SUB-ASSEMBLY LH (w/ Climate Control Seat System)
5. REMOVE FRONT SEATBACK BOARD CLIP (w/ Climate Control Seat System)
6. REMOVE SEPARATE TYPE FRONT SEATBACK COVER WITH PAD (for Manual Seat)
|
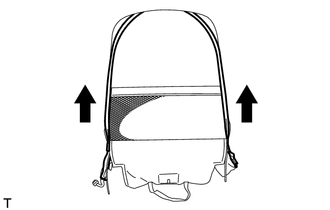
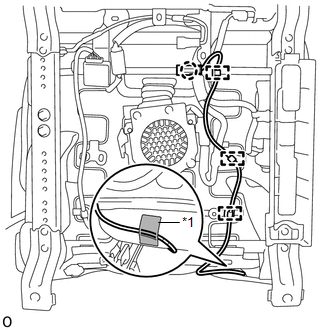
(a) Remove the rubber band from the separate type front seat cushion spring assembly. Text in Illustration
|
|

|
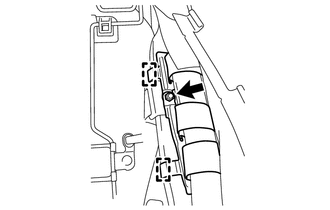
(b) Detach the claw to disconnect the airbag connector. |
|
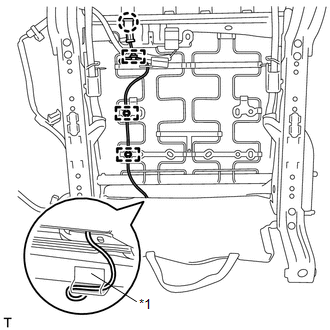
(c) Detach the 3 airbag wire harness clamps.
(d) Detach the fastening tape to disconnect the airbag wire harness.
Text in Illustration|
*1 |
Fastening Tape |
|
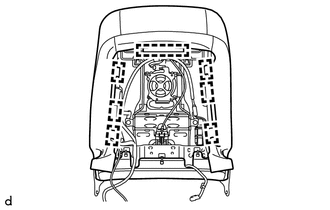
(e) Remove the 3 hog rings. |
|

|
(f) Open the 2 fasteners and separate type front seatback cover. |
|
|
(g) Remove the nut, detach the 2 hooks to disconnect the seatback cover bracket from the separate type front seatback spring assembly. |
|
|
(h) Using a screwdriver, detach the 4 claws to remove the 2 front seat headrest supports. |
|
.png)
(i) Remove the separate type front seatback cover with pad from the separate type front seatback spring assembly.
7. REMOVE SEPARATE TYPE FRONT SEATBACK COVER WITH PAD (for Power Seat)
(a) w/o Climate Control Seat System:
|
(1) Remove the rubber band from the separate type front seat cushion spring assembly. Text in Illustration
|
|
|
(2) Detach the claw to disconnect the airbag connector. |
|
(3) Detach the 3 airbag wire harness clamps.
(4) Detach the fastening tape to disconnect the airbag wire harness.
Text in Illustration|
*1 |
Fastening Tape |
|
(5) Remove the 3 hog rings. |
|
(6) Open the 2 fasteners and separate type front seatback cover.
.png) Text in Illustration
Text in Illustration
|
*A |
for Cloth Seat |
*B |
for Synthetic Leather Seat |
|
(7) Remove the nut and detach the 2 hooks to disconnect the seatback cover bracket from the separate type front seatback spring assembly. |
|
.png)
|
(8) Using a screwdriver, detach the 4 claws to remove the 2 front seat headrest supports. |
|
(9) Remove the separate type front seatback cover with pad from the separate type front seatback spring assembly.
(b) w/ Climate Control Seat System:
|
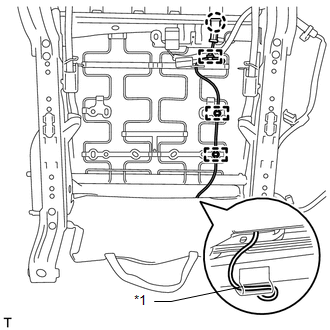
(1) Detach the claw to disconnect the airbag connector. |
|
(2) Detach the 3 airbag wire harness clamps.
(3) Detach the fastening tape to disconnect the airbag wire harness.
Text in Illustration|
*1 |
Fastening Tape |
|
(4) Detach the 7 hooks. |
|
|
(5) Remove the 5 hog rings. |
|
.png)
|
(6) Remove the nut and detach the 2 hooks to disconnect the seatback cover bracket from the separate type front seatback spring assembly |
|
|
(7) Using a screwdriver, detach the 4 claws to remove the 2 front seat headrest supports. |
|
(8) Remove the separate type front seatback cover with pad from the separate type front seatback spring assembly.
8. REMOVE FRONT SEAT SIDE AIRBAG ASSEMBLY
|
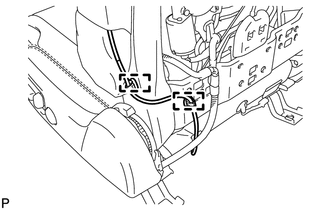
(a) Detach the 2 clamps to disconnect the front seat side airbag wire harness. |
|
|
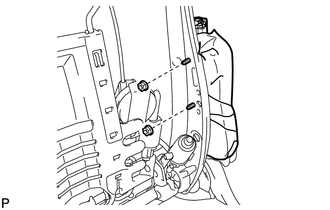
(b) Using an E10 "TORX" socket wrench, remove the 2 nuts and front seat side airbag assembly. CAUTION:
|
|
 Installation
INSTALLATION
CAUTION / NOTICE / HINT
CAUTION:
Wear protective gloves. Sharp areas on the parts may injure your hands.
HINT:
Use the same procedure for the power seat RH and power seat LH ...
 Disposal
DISPOSAL
CAUTION / NOTICE / HINT
CAUTION:
Before performing pre-disposal deployment of any SRS part, review and closely
follow all applicable environmental and hazardous material regulations. Pre ...
Other materials about Toyota 4Runner:
Inspection
INSPECTION
PROCEDURE
1. INSPECT SIDE AUTO STEP MOTOR ASSEMBLY
(a) Check that the motor gear rotates smoothly as follows.
NOTICE:
Do not apply positive (+) battery voltage to any terminals except terminal
5 and 4 to avoid damaging the pu ...
Customize Parameters
CUSTOMIZE PARAMETERS
1. CUSTOMIZING FUNCTION WITH TECHSTREAM (REFERENCE)
HINT:
The following items can be customized.
NOTICE:
When the customer requests a change in a function, first make sure that
the function can be customized.
Record th ...

0.0246