Toyota 4Runner: Removal
REMOVAL
PROCEDURE
1. REMOVE FRONT BUMPER COVER (w/o Intuitive Parking Assist System)
(See page .gif) )
)
2. REMOVE FRONT BUMPER COVER (w/ Intuitive Parking Assist System)
(See page )
3. REMOVE HIGH PITCHED HORN ASSEMBLY
4. REMOVE RADIATOR GRILLE BRACKET
5. REMOVE LOW PITCHED HORN ASSEMBLY
6. REMOVE HOOD LOCK CONTROL CABLE COVER
|
(a) Remove the 2 screws. |
|
(b) Detach the claw to remove the hood lock control cable cover.
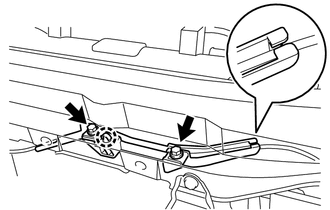
7. REMOVE HOOD LOCK ASSEMBLY
|
(a) Remove the 3 bolts. |
|
.png)
|
(b) Detach the clamp. |
|
.png)
(c) Disconnect the connector.
(d) Disconnect the hood lock control cable to remove the hood lock assembly.
 Inspection
INSPECTION
PROCEDURE
1. INSPECT HOOD LOCK ASSEMBLY (ENGINE HOOD COURTESY SWITCH)
(a) Measure the resistance according to the value(s) in the table below.
Standard Resistance:
Tester ...
 Installation
INSTALLATION
PROCEDURE
1. INSTALL HOOD LOCK ASSEMBLY
(a) Apply MP grease to the sliding areas of the hood lock assembly.
(b) Connect the hood lock control cable assembly.
(c) Connect the connecto ...
Other materials about Toyota 4Runner:
Reassembly
REASSEMBLY
PROCEDURE
1. INSTALL SHIFT SOLENOID VALVE S2
(a) Coat a new O-ring with ATF and install it to the solenoid valve.
Text in Illustration
*1
New O-Ring
...
Operation Check
OPERATION CHECK
1. NOTICES WHEN CHECKING
(a) Wireless door lock/unlock function:
This function operates only when the vehicle is in its initial condition (the
following 3 conditions are met).
No key is inserted into the ignition key cylinder.
...

0.0073