Toyota 4Runner: Removal
REMOVAL
CAUTION / NOTICE / HINT
HINT:
- Use the same procedure for the RH and LH sides.
- The procedure listed below is for the LH side.
PROCEDURE
1. DISCONNECT CABLE FROM NEGATIVE BATTERY TERMINAL
NOTICE:
When disconnecting the cable, some systems need to be initialized after the cable
is reconnected (See page .gif) ).
).
2. REMOVE REAR WHEEL
3. DRAIN BRAKE FLUID
4. DISCONNECT REAR FLEXIBLE HOSE LH
5. REMOVE REAR SPEED SENSOR LH
6. REMOVE PARKING BRAKE ASSEMBLY
(a) Remove the parking brake assembly (See page
).
7. REMOVE REAR AXLE SHAFT WITH PARKING BRAKE PLATE LH
|
(a) Remove the 4 nuts and rear axle shaft with parking brake plate. |
|
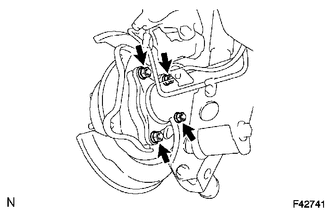
(b) Remove the O-ring.
8. REMOVE REAR AXLE SHAFT OIL SEAL LH
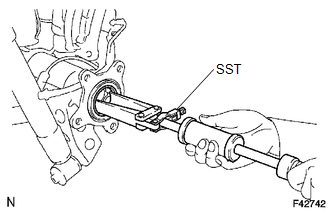
(a) Using SST, remove the rear axle shaft oil seal.
SST: 09308-00010
 Disassembly
DISASSEMBLY
PROCEDURE
1. REMOVE REAR AXLE SHAFT SNAP RING LH
(a) Using a snap ring expander, remove the snap ring.
2. REMOVE REAR AXLE SHAFT LH
(a) Using SST and a press, press out the rear a ...
 Inspection
INSPECTION
PROCEDURE
1. INSPECT REAR AXLE SHAFT
(a) Using a dial indicator, measure the rear axle shaft runout and flange runout.
Maximum runout:
Shaft runout: 1.50 mm (0.0591 in.)
Flange run ...
Other materials about Toyota 4Runner:
Clearance Warning Buzzer Circuit
DESCRIPTION
The clearance warning buzzer sounds to alert the driver. The sounding pattern
changes depending on the distance to an obstacle.
WIRING DIAGRAM
PROCEDURE
1.
CHECK HARNESS AND CONNECTOR (CLEARANCE WARNING ECU ASSEMBLY - ...
Diagnosis System
DIAGNOSIS SYSTEM
1. CHECK DLC3
(a) Check the DLC3 (See page ).
2. FUNCTION OF POWER STEERING WARNING LIGHT
(a) When a malfunction is detected in the power steering system, the power steering
warning light in the combination meter comes on to inform the ...

0.0178