Toyota 4Runner: Compass
The compass on the accessory meter display indicates the direction in which the vehicle is heading.
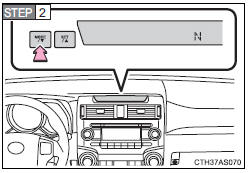
1. “MODE/  ” button
2. “SET/  ” button
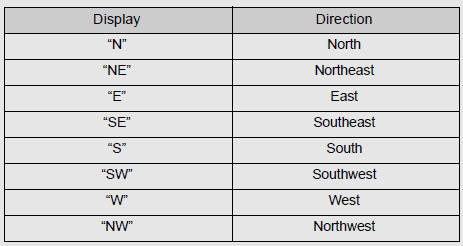
3. Direction display
Displays and directions
Calibrating the compass
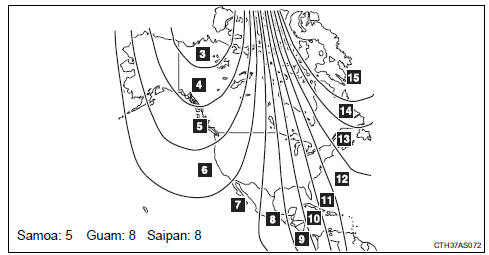
The direction display deviates from the true direction determined by the earth’s magnetic field. The amount of deviation varies depending on the geographic position of the vehicle.
If you cross over one of the map boundaries shown in illustration, the compass will deviate.
To obtain higher precision or perfect calibration, refer to “Deviation calibration”.
Deviation calibration
 Stop the vehicle.
 Change the accessory meter
display to deviation calibration mode by doing the following.
Vehicles without Multi-terrain Select
When the parking lights are turned on: Press and hold the “MODE/
 ” button.
A number (1 to 15) will appear on the display.
When the parking lights are off:
In accessory meter light control mode , press and hold the “MODE/
 ” button.
A number (1 to 15) will appear on the display.
Vehicles with Multi-terrain Select
When the parking lights are turned on:
Press and hold the “MODE/ ”
button.
A number (1 to 15) will appear on the display.
When the parking lights are off: In accessory meter light control mode ,
press and hold the “MODE/ ” button.
A number (1 to 15) will appear on the display.
 Referring to the map above, press
the “MODE/ ” or “SET/
 ” button to select the number of the
zone you are in.
 Press and hold the “SET/
 ” button to confirm the number and
to exit deviation calibration mode. (If the button is pressed for more than 6
seconds, the number will automatically be confirmed and the display returned to
normal.)
Circling calibration
If “ •” appears on the left side of the direction display, circling calibration needs to be performed.
Stop the vehicle in a place where
it is safe to drive in a circle.
In deviation calibration mode , press and hold the “MODE/
” button to change to circling
calibration mode.
“ •” on the left side of the direction display will blink.
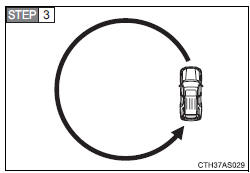
Drive the vehicle in a circle completing at least one full circle within 20 - 120 seconds.
If there is not enough space to drive in a circle, drive around the block until a direction is displayed.
Press and hold the “SET/
” button to confirm the direction
and to exit circling calibration mode. (If the button is pressed for several
minutes, the direction will automatically be confirmed and the display returned
to normal.)
 Make sure that “
•” on the left side of the direction display has gone off. If “
•” is illuminated, perform the above procedure again.
Conditions unfavorable to correct operation
The compass may not show the correct direction in the following conditions:
• The vehicle is stopped immediately after turning.
• The vehicle is on an inclined surface.
• The vehicle is in a place where the earth's magnetic field is subject to interference by artificial magnetic fields (underground car park/parking lot, under a steel tower, between buildings, roof car park/parking lot, near an intersection, near a large vehicle, etc.).
• The vehicle has become magnetized.
(There is a magnet or metal object near the accessory meter display.)
• The battery has been disconnected.
• A door is open.
Circling calibration error message (vehicles with Multi-terrain Select)
In the following situations, an error message regarding the circling calibration will appear on the accessory meter display for a few seconds:
• The vehicle was driven too fast during the circling calibration.
• The circling calibration was not completed successfully within about two minutes.
CAUTION
While driving the vehicle
Do not adjust the display. Adjust the display only when the vehicle is stopped.
When doing the circling calibration
Secure a wide space, and watch out for people and vehicles in the vicinity.
Do not violate any local traffic rules while performing circling calibration.
NOTICE
To avoid compass malfunctions
Do not place magnets or any metal objects near the accessory meter display.
Doing this may cause the compass sensor to malfunction.
To ensure normal operation of the compass
• Do not perform a circling calibration of the compass in a place where the earth's magnetic field is subject to interference by artificial magnetic fields.
• During calibration, do not operate electric systems (moon roof, power windows, etc.) as they may interfere with the calibration.
 Floor mat
Use only floor mats designed specifically for vehicles of the same model
and model year as your vehicle. Fix them securely in place onto the carpet.
Insert the retaining hooks (clips) into the fl ...
 Luggage compartment features
Cargo hooks
Vehicles with third seats
Fold down the third seats.
Raise the hook to use.
The cargo hooks are provided for securing loose items.
Vehicles without third seats
Raise the hook to ...
Other materials about Toyota 4Runner:
Sliding Roof Control Switch Circuit
DESCRIPTION
The sliding roof drive gear sub-assembly (sliding roof ECU) receives sliding
roof switch signals and drives its built-in motor.
WIRING DIAGRAM
CAUTION / NOTICE / HINT
NOTICE:
When the sliding roof drive gear sub-assembly (sliding roof ECU) ...
Prl Update
PRL UPDATE
1. PRL UPDATE
This function updates the PRL (Preferred Roaming List) of the DCM (Telematics
Transceiver). The PRL is a large set of phone numbers the DCM (Telematics Transceiver)
can utilize to make an emergency call when outside (roaming) the ...

0.0069