
Toyota 4Runner: Installation
INSTALLATION
CAUTION / NOTICE / HINT
NOTICE:
Be sure to read the precaution before performing this procedure (See page
.gif) ).
).
HINT:
- Use the same procedure for the RH and LH sides.
- The procedure listed below is for the LH side.
- A bolt without a torque specification is shown in the standard bolt
chart (See page ).
PROCEDURE
1. TEMPORARILY INSTALL FRONT SHOCK ABSORBER WITH COIL SPRING (w/ REAS)
|
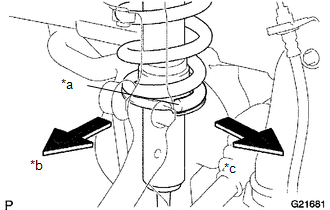
(a) Install the coil spring to the vehicle body with the lower end of the coil spring facing the rear side of the vehicle. Text in Illustration
|
|
|
(b) Install the 3 nuts to the upper side of the front shock absorber with coil spring. Torque: 64 N·m {653 kgf·cm, 47 ft·lbf} |
|
.png)
|
(c) Temporarily install the bolt, nut and washer as shown in the illustration. |
|
.png)
|
(d) Install the bolt. Torque: 29 N·m {296 kgf·cm, 21 ft·lbf} NOTICE: Be sure to fit the detents attached to the bracket into a hole on the frame side. |
|
.png)
|
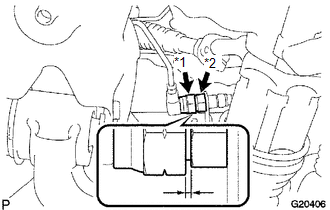
(e) As shown in the illustration, tighten the nut so that the clearance reaches the standard value. Clearance: 1 mm (0.0394 in.) Reference torque: 25 N*m (255 kgf*cm, 18 ft.*lbf) Text in Illustration
|
|
2. TEMPORARILY INSTALL FRONT SHOCK ABSORBER WITH COIL SPRING (w/o REAS)
|
(a) Install the coil spring to the vehicle body with the lower end of the coil spring facing the rear side of the vehicle. Text in Illustration
|
|
|
(b) Install the 3 nuts to the upper side of the front shock absorber with coil spring. Torque: 64 N·m {653 kgf·cm, 47 ft·lbf} |
|
|
(c) Temporarily install the bolt, nut and washer as shown in the illustration. |
|
3. INSTALL FRONT STABILIZER BAR (w/ KDSS)
4. INSTALL FRONT STABILIZER END BRACKET (w/ KDSS)
5. INSTALL FRONT STABILIZER BAR (w/o KDSS)
6. INSTALL FRONT NO. 1 STABILIZER BRACKET LH (w/o KDSS)
7. INSTALL FRONT NO. 1 STABILIZER BRACKET RH (w/o KDSS)
8. CONNECT FRONT STABILIZER LINK ASSEMBLY LH (w/o KDSS)
|
(a) Connect the stabilizer link to the steering knuckle with the nut. Torque: 70 N·m {710 kgf·cm, 52 ft·lbf} HINT: If the ball joint turns together with the nut, use a 6 mm hexagon wrench to hold the stud. |
|
.png)
9. CONNECT FRONT STABILIZER LINK ASSEMBLY RH (w/o KDSS)
HINT:
Use the same procedure described for the LH side.
10. INSTALL FRONT SUSPENSION MEMBER BRACE SUB-ASSEMBLY
11. INSTALL NO. 1 ENGINE UNDER COVER SUB-ASSEMBLY
12. INSTALL LOWER FRONT BUMPER COVER
13. INSTALL FRONT WHEEL
Torque:
for aluminum wheel :
103 N·m {1050 kgf·cm, 76 ft·lbf}
for steel wheel :
112 N·m {1142 kgf·cm, 83 ft·lbf}
14. STABILIZE SUSPENSION
(a) Lower the vehicle.
(b) Bounce the vehicle up and down several times to stabilize the suspension.
15. TIGHTEN FRONT SHOCK ABSORBER WITH COIL SPRING
|
(a) Tighten the nut. Torque: 95 N·m {969 kgf·cm, 70 ft·lbf} |
|
16. INSPECT AND ADJUST FRONT WHEEL ALIGNMENT
(a) Inspect and adjust the front wheel alignment (See page
).
 Reassembly
REASSEMBLY
PROCEDURE
1. INSTALL FRONT SHOCK ABSORBER BUSH
(a) Using SST and a press, install a new absorber bush.
SST: 09710-30012
09710-04071
09710-04081
...
 Disposal
DISPOSAL
PROCEDURE
1. DISPOSE OF FRONT SHOCK ABSORBER ASSEMBLY LH (w/ REAS)
HINT:
Use the same procedure for the other front shock absorber.
(a) Before disposal, loosen the nut slowly ...
Other materials about Toyota 4Runner:
Problem Symptoms Table
PROBLEM SYMPTOMS TABLE
HINT:
Use the table below to help determine the cause of problem symptoms.
If multiple suspected areas are listed, the potential causes of the symptoms
are listed in order of probability in the "Suspected Area" ...
Party mode switch
Party mode switch You can switch the sounds quality types by pressing the
switch.
1. Base mode
2. Party mode
In party mode, the sound volume from the speakers on the back door is bigger
than in base mode.
(The output from the speakers on the rear do ...

0.0113