Toyota 4Runner: Installation
INSTALLATION
PROCEDURE
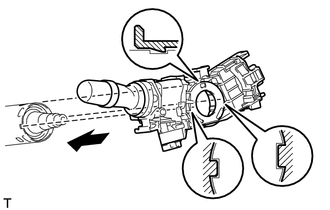
1. INSTALL HEADLIGHT DIMMER SWITCH ASSEMBLY
|
(a) Install the headlight dimmer switch to the steering column, making sure that the stopper protrusions and cutout parts align. |
|
|
(b) While loosening the band clamp, attach the claw to install the headlight dimmer switch. |
|
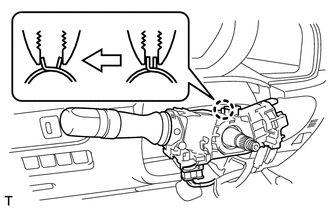
(c) Connect the connector.
2. INSTALL WINDSHIELD WIPER SWITCH ASSEMBLY
.gif)
3. INSTALL SPIRAL CABLE SUB-ASSEMBLY
(a) Install the spiral cable sub-assembly (See page
).
 Inspection
INSPECTION
PROCEDURE
1. INSPECT HEADLIGHT DIMMER SWITCH ASSEMBLY
(a) Inspect the light control switch.
(1) Measure the resistance according to the value(s) in the table below.
Stan ...
 High Mounted Stop Light Assembly
Components
COMPONENTS
ILLUSTRATION
Removal
REMOVAL
PROCEDURE
1. REMOVE CENTER STOP LIGHT ASSEMBLY
(a) Remove the 2 screws and stop light.
...
Other materials about Toyota 4Runner:
Installation
INSTALLATION
PROCEDURE
1. INSTALL NAVIGATION ANTENNA ASSEMBLY
(a) Install the antenna with the 2 screws.
Torque:
2.5 N·m {25 kgf·cm, 22 in·lbf}
(b) Attach the clamp.
2. INSTALL DEFROSTER NOZZLE ASSEMBLY
3. INSTALL NO. 3 HEATER TO REGISTER DUCT
...
Light Control Rheostat
Components
COMPONENTS
ILLUSTRATION
Inspection
INSPECTION
PROCEDURE
1. INSPECT LIGHT CONTROL RHEOSTAT (w/o TAIL Cancel Switch)
(a) Measure the resistance according to the value(s) in the table below.
Standard Resistance:
Tester Conn ...

0.0093