Toyota 4Runner: Rear No. 1 Seat Inner Belt Assembly(for 60/40 Split Double-folding Seat Type Lh Side)
Components
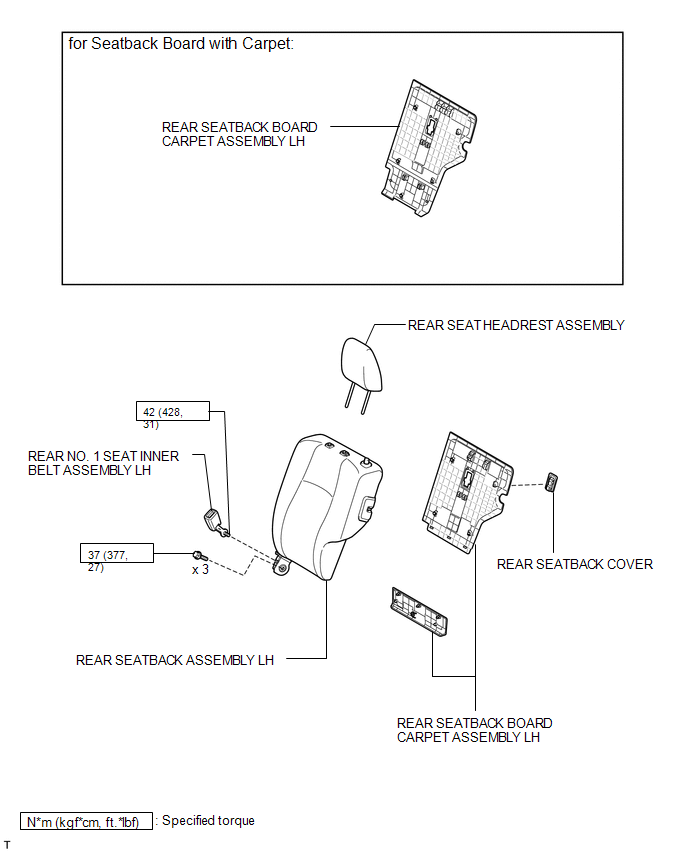
COMPONENTS
ILLUSTRATION
Installation
INSTALLATION
PROCEDURE
1. INSTALL REAR NO. 1 SEAT INNER BELT ASSEMBLY LH
(a) Install the inner belt with the bolt.
Torque:
42 N·m {428 kgf·cm, 31 ft·lbf}
2. INSTALL REAR SEATBACK ASSEMBLY LH
.gif)
3. INSTALL REAR SEATBACK BOARD CARPET ASSEMBLY LH
4. INSTALL REAR SEATBACK COVER
5. INSTALL REAR SEAT HEADREST ASSEMBLY
(a) Install the rear seat headrest assembly (See page
).
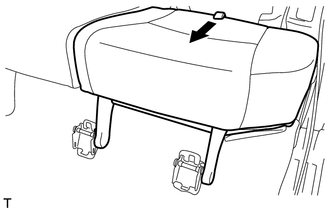
(b) Return the seat cushion to its original position.
Removal
REMOVAL
PROCEDURE
1. REMOVE REAR SEAT HEADREST ASSEMBLY
|
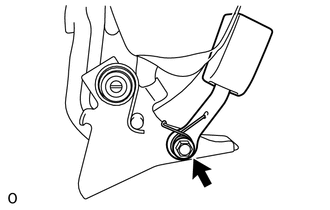
(a) Pull the rear seat cushion band, release the lock and lift up the back of the seat cushion to rotate it forward. |
|
(b) Remove the rear seat headrest assembly (See page
.gif) ).
).
2. REMOVE REAR SEATBACK COVER
3. REMOVE REAR SEATBACK BOARD CARPET ASSEMBLY LH
4. REMOVE REAR SEATBACK ASSEMBLY LH
5. REMOVE REAR NO. 1 SEAT INNER BELT ASSEMBLY LH
(a) Remove the bolt and inner belt.
 Installation
INSTALLATION
CAUTION / NOTICE / HINT
CAUTION:
Wear protective gloves. Sharp areas on the parts may injure your hands.
HINT:
A bolt without a torque specification is shown in the standard bolt cha ...
 Rear No. 1 Seat Inner Belt Assembly(for 60/40 Split Double-folding Seat Type
Rh Side)
Rear No. 1 Seat Inner Belt Assembly(for 60/40 Split Double-folding Seat Type
Rh Side)
Components
COMPONENTS
ILLUSTRATION
Removal
REMOVAL
PROCEDURE
1. DISCONNECT REAR NO. 1 SEAT OUTER BELT ASSEMBLY RH
(a) Pull the rear seat cushion band, release the lock and lift ...
Other materials about Toyota 4Runner:
No Response from ID BOX (B2789)
DESCRIPTION
This DTC is stored when LIN communication between the certification ECU and ID
code box stops for 10 seconds or more.
DTC Code
DTC Detection Condition
Trouble Area
B2789
No communicat ...
Diagnostic Trouble Code Chart
DIAGNOSTIC TROUBLE CODE CHART
Rear View Monitor System
DTC No.
Detection Item
Link
C1622
Back Camera Disconnected
...
0.0261