Toyota 4Runner: Removal
REMOVAL
CAUTION / NOTICE / HINT
HINT:
- Use the same procedure for the RH and LH sides.
- The procedure listed below is for the LH side.
PROCEDURE
1. DISCONNECT CABLE FROM NEGATIVE BATTERY TERMINAL
CAUTION:
Wait at least 90 seconds after disconnecting the cable from the negative (-) battery terminal to disable the SRS system.
NOTICE:
When disconnecting the cable, some systems need to be initialized after the cable
is reconnected (See page .gif) ).
).
2. REMOVE FRONT DOOR LOWER FRAME BRACKET GARNISH LH
3. REMOVE NO. 2 DOOR INSIDE HANDLE BEZEL LH
4. REMOVE FRONT DOOR TRIM BOARD SUB-ASSEMBLY LH
5. REMOVE FRONT DOOR INNER GLASS WEATHERSTRIP LH
6. REMOVE FRONT DOOR SERVICE HOLE COVER LH
7. REMOVE OUTER REAR VIEW MIRROR ASSEMBLY LH
8. REMOVE FRONT DOOR GLASS SUB-ASSEMBLY LH
9. REMOVE FRONT DOOR GLASS RUN LH
10. REMOVE FRONT DOOR BELT MOULDING LH
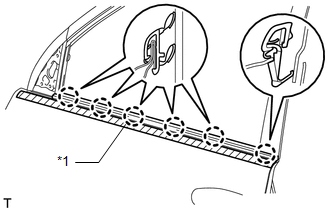
(a) Put protective tape around the belt moulding.
Text in Illustration|
*1 |
Protective Tape |
(b) Detach the 6 claws and remove the front door belt moulding.
 Components
COMPONENTS
ILLUSTRATION
ILLUSTRATION
...
 Installation
INSTALLATION
CAUTION / NOTICE / HINT
HINT:
Use the same procedure for the RH and LH sides.
The procedure listed below is for the LH side.
PROCEDURE
1. INSTALL FRONT DOOR BELT MO ...
Other materials about Toyota 4Runner:
Precaution
PRECAUTION
1. IGNITION SWITCH EXPRESSIONS
(a) The type of ignition switch used on this model differs according to the specifications
of the vehicles. The expressions listed in the table below are used in this section.
Expression
Igni ...
Lost Communication with Gateway Module (U1002)
DESCRIPTION
The main body ECU (multiplex network body ECU) stores this DTC when
no signals can be received from the ECUs that are memorized as those connected
to the CAN MS bus.
When the main body ECU (multiplex network body ECU) receives a ...

0.0267