
Toyota 4Runner: Removal
REMOVAL
PROCEDURE
1. DISCONNECT CABLE FROM NEGATIVE BATTERY TERMINAL
CAUTION:
Wait at least 90 seconds after disconnecting the cable from the negative (-) battery terminal to disable the SRS system.
NOTICE:
When disconnecting the cable, some systems need to be initialized after the cable
is reconnected (See page .gif) ).
).
2. REMOVE ASSIST STRAP HOLE COVER
3. REMOVE ASSIST STRAP ASSEMBLY
4. REMOVE BACK DOOR TRIM PANEL ASSEMBLY
5. REMOVE REAR NO. 2 SPEAKER ASSEMBLY
6. REMOVE MULTIPLEX NETWORK DOOR ECU
7. REMOVE NO. 2 BACK DOOR SERVICE HOLE COVER
8. REMOVE BACK DOOR SERVICE HOLE COVER LH
9. REMOVE BACK DOOR SERVICE HOLE COVER RH
10. REMOVE BACK DOOR OUTSIDE MOULDING LH
11. REMOVE BACK DOOR OUTSIDE MOULDING RH
HINT:
Use the same procedure as described for the LH side.
12. REMOVE REAR NO. 1 SPOILER COVER
13. REMOVE REAR SPOILER SUB-ASSEMBLY
14. REMOVE REAR WIPER ARM
15. REMOVE REAR WIPER MOTOR AND BRACKET ASSEMBLY
16. REMOVE NO. 1 BACK WINDOW WIPER MOTOR BRACKET
17. REMOVE BACK DOOR GLASS RUN
18. REMOVE BACK DOOR GLASS
19. REMOVE OUTER BACK DOOR GLASS WEATHERSTRIP ASSEMBLY
20. REMOVE BACK DOOR POWER WINDOW REGULATOR SUB-ASSEMBLY
21. REMOVE BACK DOOR POWER WINDOW REGULATOR MOTOR ASSEMBLY
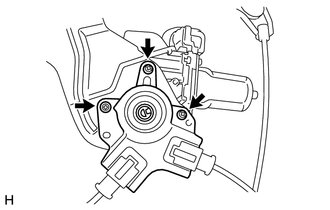
(a) Using a T25 "TORX" socket wrench, remove the 3 screws and power window regulator motor.
NOTICE:
Be careful when removing the screws as the motor may fall and become damaged.
 Components
COMPONENTS
ILLUSTRATION
ILLUSTRATION
...
 Inspection
INSPECTION
PROCEDURE
1. INSPECT BACK DOOR POWER WINDOW REGULATOR MOTOR ASSEMBLY
(a) Check that the motor gear rotates smoothly as follows.
NOTICE:
Do not apply positive (+) battery ...
Other materials about Toyota 4Runner:
Power Management Control ECU Communication Stop Mode
DESCRIPTION
Detection Item
Symptom
Trouble Area
Power Management Control ECU Communication Stop Mode
Either condition is met:
"Power Management1" is not displayed on the &quo ...
Lost Communication with ECM/PCM "A" (U0100/71,U0122/71,U0124/71,U0126/71)
DESCRIPTION
DTC Code
DTC Detection Condition
Trouble Area
U0100/71
While driving at 30 km/h (19 mph), the ECM indicates a CAN communication
stop for 3 seconds or more.
CAN communicati ...

0.0264