Toyota 4Runner: Removal
REMOVAL
CAUTION / NOTICE / HINT
CAUTION:
Wear protective gloves. Sharp areas on the parts may injure your hands.
PROCEDURE
1. REMOVE REAR SEAT HEADREST ASSEMBLY
(a) Remove the headrest.
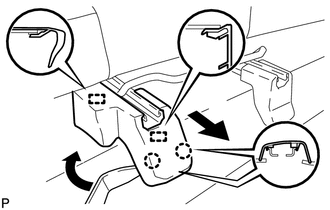
2. REMOVE REAR SEAT TRACK INNER BRACKET COVER
(a) Using a moulding remover, detach the 2 claws and guide, and then remove the cover.
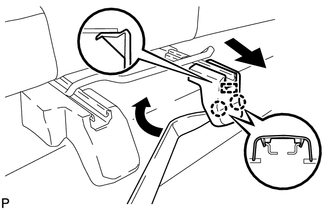
3. REMOVE REAR SEAT TRACK OUTER BRACKET COVER
(a) Using a moulding remover, detach the 2 claws.
(b) Move the cover in the direction of the arrow to detach the 2 guides and remove the cover.
4. REMOVE SEAT TRACK INNER BRACKET COVER RH
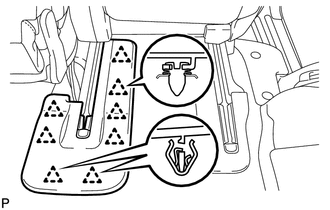
(a) Using a clip remover, detach the 8 clips and remove the cover.
5. REMOVE REAR SEAT TRACK COVER RH
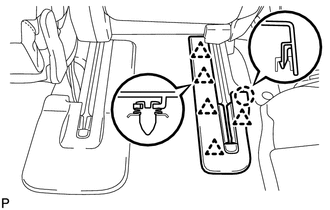
(a) Using a clip remover, detach the 5 clips and claw, and then remove the cover.
6. REMOVE REAR SEAT ASSEMBLY RH
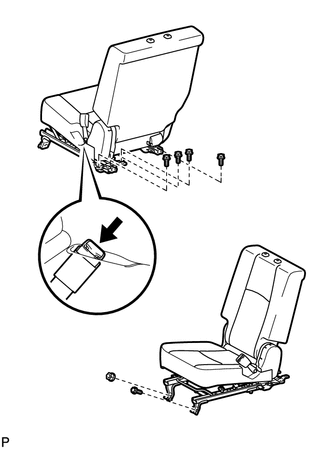
(a) Disconnect the center inner seat belt from the seat.
(b) Remove the 5 bolts and nut.
(c) Remove the rear seat.
NOTICE:
Be careful not to damage the vehicle body.
HINT:
Be sure to remove the seat with the seatback folded down.
 Components
COMPONENTS
ILLUSTRATION
ILLUSTRATION
ILLUSTRATION
ILLUSTRATION
ILLUSTRATION
...
 Reassembly
REASSEMBLY
CAUTION / NOTICE / HINT
CAUTION:
Wear protective gloves. Sharp areas on the parts may injure your hands.
HINT:
A bolt without a torque specification is shown in the standard bolt chart ...
Other materials about Toyota 4Runner:
Using the AUX port
This port can be used to connect a portable audio device and listen to it
through the vehicle’s speakers.
Pull up the lid.
Open the cover and connect the portable audio device.
Press
or
.
Operating portable audio devices connected to the audio ...
Disassembly
DISASSEMBLY
PROCEDURE
1. REMOVE NO. 1 BRAKE ACTUATOR BRACKET
(a) Using a 5 mm hexagon wrench, remove the bolt and No. 1 brake actuator
bracket.
(b) Using a screwdriver, remove the brake fl ...

0.025