Toyota 4Runner: Removal
REMOVAL
CAUTION / NOTICE / HINT
HINT:
- Use the same procedure for the RH and LH sides.
- The procedure listed below is for the LH side.
PROCEDURE
1. REMOVE REAR WHEEL
2. DRAIN BRAKE FLUID
NOTICE:
Wash the brake fluid off immediately if it adheres to any painted surfaces.
3. DISCONNECT REAR FLEXIBLE HOSE LH
|
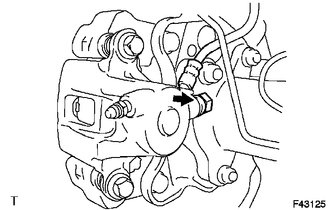
(a) Remove the union bolt and gasket from the rear disc brake cylinder, and then disconnect the rear flexible hose from the rear disc brake cylinder. HINT: Use a container to catch brake fluid as it drains out. |
|
4. REMOVE REAR DISC BRAKE CYLINDER ASSEMBLY LH
|
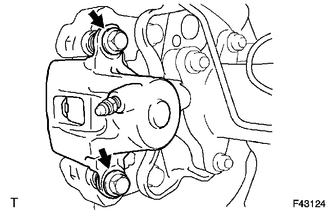
(a) Remove the 2 cylinder slide pins from the rear disc brake cylinder. |
|
(b) Remove the rear disc brake cylinder from the rear disc brake cylinder mounting.
5. REMOVE REAR DISC BRAKE PAD
(a) Remove the 2 rear disc brake pads together with the rear disc brake anti-squeal shims from the rear disc brake cylinder mounting.
6. REMOVE REAR DISC BRAKE ANTI-SQUEAL SHIM
(a) Remove the 2 rear disc brake anti-squeal shims from the rear disc brake pads.
7. REMOVE REAR DISC BRAKE PAD WEAR INDICATOR PLATE
(a) Remove the rear disc brake pad wear indicator plate from the inner disc brake pad.
8. REMOVE REAR NO. 1 DISC BRAKE PAD SUPPORT PLATE
NOTICE:
If it is necessary to remove the pad support plates, replace them with new ones.
(a) Remove the 2 pad support plates from the rear disc brake cylinder mounting.
9. REMOVE REAR NO. 2 DISC BRAKE PAD SUPPORT PLATE
NOTICE:
If it is necessary to remove the pad support plates, replace them with new ones.
(a) Remove the 2 pad support plates from the rear disc brake cylinder mounting.
10. REMOVE REAR DISC BRAKE CYLINDER MOUNTING LH
|
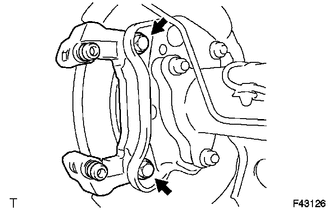
(a) Remove the 2 bolts, 2 plate washers and rear disc brake cylinder mounting. |
|
11. REMOVE REAR DISC BRAKE BUSH DUST BOOT
(a) Remove the rear disc brake bush dust boot from the rear disc brake cylinder mounting.
12. REMOVE REAR DISC BRAKE CYLINDER SLIDE BUSH
(a) Remove the rear disc brake cylinder slide bush from the rear disc brake cylinder mounting.
13. REMOVE REAR DISC BRAKE CYLINDER HOLE PLUG
(a) Remove the rear disc brake cylinder hole plug from the rear disc brake cylinder mounting.
14. REMOVE REAR DISC
|
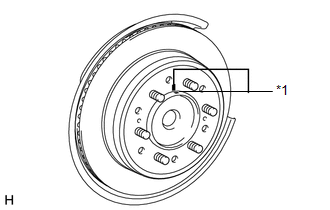
(a) Put matchmarks on the rear disc and axle hub if planning to reuse the disc. Text in Illustration
|
|
(b) Turn the shoe adjuster until the disc turns freely, and then remove the disc.
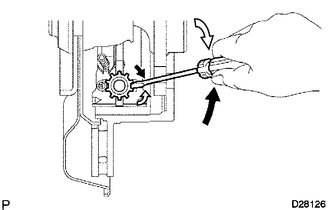 Text in Illustration
 |
Shoe Adjuster Contracts |
 |
Shoe Adjuster Expands |
(c) Remove the rear disc.
 Disassembly
DISASSEMBLY
PROCEDURE
1. REMOVE CYLINDER BOOT
(a) Using a screwdriver, remove the cylinder boot from the rear disc
brake cylinder.
HINT:
Tape the screwdriver tip before use.
...
 Inspection
INSPECTION
PROCEDURE
1. CHECK PAD LINING THICKNESS
(a) Using a ruler, measure the pad lining thickness.
Standard thickness:
10.0 mm (0.394 in.)
Minimum thickness:
1.0 mm (0 ...
Other materials about Toyota 4Runner:
Air Mix Damper Control Servo Motor Circuit (Passenger Side) (B1441)
DESCRIPTION
The damper servo sub-assembly (air mix damper servo) sends pulse signals to inform
the No. 1 air conditioning amplifier assembly of the damper position. The No. 1
air conditioning amplifier assembly activates the motor (normal or reverse) base ...
Front Airbag Sensor RH Malfunction (B1610/13)
DESCRIPTION
The front airbag sensor RH consists of the diagnostic circuit and frontal deceleration
sensor, etc.
If the center airbag sensor receives signals from the frontal deceleration sensor,
it determines whether the SRS should be activated.
DTC B16 ...
0.0066

