
Toyota 4Runner: Sliding Roof ECU Communication Stop (B1273)
DESCRIPTION
This DTC is stored when LIN communication between the sliding roof ECU (sliding roof drive gear sub-assembly) and main body ECU (multiplex network body ECU) stops for 10 seconds or more.
|
DTC Code |
DTC Detection Condition |
Trouble Area |
|---|---|---|
|
B1273 |
No communication between the sliding roof ECU (sliding roof drive gear sub-assembly) and main body ECU (multiplex network body ECU) for 10 seconds or more. |
|
WIRING DIAGRAM
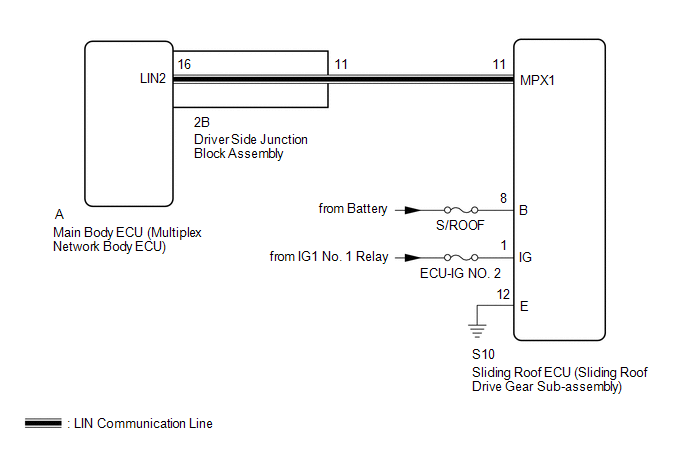
CAUTION / NOTICE / HINT
NOTICE:
- When using the Techstream with the ignition switch off to troubleshoot:
Connect the Techstream to the vehicle and turn a courtesy light switch on and off at 1.5 second intervals until communication between the Techstream and vehicle begins.
- Inspect the fuses and bulbs for circuits related to this system before performing the following inspection procedure.
HINT:
When communication between the sliding roof ECU (sliding roof drive gear sub-assembly) and main body ECU (multiplex network body ECU) stops, DTC B2325 is also stored.
PROCEDURE
|
1. |
CLEAR DTC |
(a) Clear the DTCs (See page .gif) ).
).
|
.gif)
|
2. |
CHECK FOR DTC |
(a) Check for DTCs (See page ).
OK:
DTC B1273 is not output.
| OK | .gif) |
USE SIMULATION METHOD TO CHECK |
|
|
3. |
CHECK HARNESS AND CONNECTOR (MAIN BODY ECU (MULTIPLEX NETWORK BODY ECU) - SLIDING ROOF ECU (SLIDING ROOF DRIVE GEAR SUB-ASSEMBLY)) |
(a) Remove the main body ECU (multiplex network body ECU) from the driver side
junction block assembly (See page ).
(b) Connect the 2B driver side junction block assembly connector.
(c) Disconnect the S10 sliding roof ECU (sliding roof drive gear sub-assembly) connector.
(d) Measure the resistance according to the value(s) in the table below.
Standard Resistance:
|
Tester Connection |
Condition |
Specified Condition |
|---|---|---|
|
A-16 (LIN2) - S10-11 (MPX1) |
Always |
Below 1 Ω |
|
A-16 (LIN2) or S10-11 (MPX1) - Body ground |
Always |
10 kΩ or higher |
| NG | |
GO TO STEP 8 |
|
|
4. |
CHECK HARNESS AND CONNECTOR (SLIDING ROOF ECU (SLIDING ROOF DRIVE GEAR SUB-ASSEMBLY) - BATTERY AND BODY GROUND) |
|
(a) Disconnect the S10 sliding roof ECU (sliding roof drive gear sub-assembly) connector. |
|
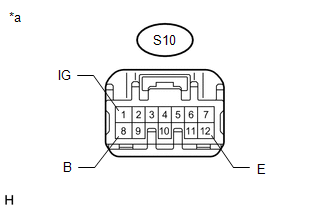
(b) Measure the resistance according to the value(s) in the table below.
Standard Resistance:
|
Tester Connection |
Condition |
Specified Condition |
|---|---|---|
|
S10-12 (E) - Body ground |
Always |
Below 1 Ω |
(c) Measure the voltage according to the value(s) in the table below.
Standard Voltage:
|
Tester Connection |
Switch Condition |
Specified Condition |
|---|---|---|
|
S10-8 (B) - Body ground |
Always |
11 to 14 V |
|
S10-1 (IG) - Body ground |
Ignition switch ON |
11 to 14 V |
|
*a |
Front view of wire harness connector (to Sliding Roof ECU (Sliding Roof Drive Gear Sub-assembly)) |
| NG | |
REPAIR OR REPLACE HARNESS OR CONNECTOR |
|
|
5. |
REPLACE SLIDING ROOF ECU (SLIDING ROOF DRIVE GEAR SUB-ASSEMBLY) |
(a) Temporarily replace the sliding roof ECU (sliding roof drive gear sub-assembly)
with a new or normally functioning one (See page
).
|
|
6. |
CLEAR DTC |
(a) Clear the DTCs (See page ).
|
|
7. |
CHECK FOR DTC |
(a) Check for DTCs (See page ).
OK:
DTC B1273 is not output.
| OK | |
END (SLIDING ROOF ECU (SLIDING ROOF DRIVE GEAR SUB-ASSEMBLY) IS DEFECTIVE) |
| NG | |
REPLACE MAIN BODY ECU (MULTIPLEX NETWORK BODY ECU) |
|
8. |
CHECK DRIVER SIDE JUNCTION BLOCK ASSEMBLY |
(a) Remove the main body ECU (multiplex network body ECU) from the driver side
junction block assembly (See page ).
(b) Measure the resistance according to the value(s) in the table below.
Standard Resistance:
|
Tester Connection |
Condition |
Specified Condition |
|---|---|---|
|
A-16 (LIN2) - 2B-11 |
Always |
Below 1 Ω |
|
A-16 (LIN2) or 2B-11 - Body ground |
Always |
10 kΩ or higher |
| OK | |
REPAIR OR REPLACE HARNESS OR CONNECTOR (DRIVER SIDE JUNCTION BLOCK ASSEMBLY - SLIDING ROOF ECU (SLIDING ROOF DRIVE GEAR SUB-ASSEMBLY)) |
| NG | |
REPLACE DRIVER SIDE JUNCTION BLOCK ASSEMBLY |
 LIN Communication Bus Malfunction (B2325)
DESCRIPTION
The main body ECU (multiplex network body ECU) intermittently monitors the LIN
communication bus between the components related to the doors and sliding roof ECU
(sliding roof drive g ...
 Air Conditioning Control Panel does not Operate
DESCRIPTION
When a switch of the air conditioning control assembly is operated, the air conditioning
control assembly uses LIN communication to communicate with the air conditioning
amplifier. If ...
Other materials about Toyota 4Runner:
On-vehicle Inspection
ON-VEHICLE INSPECTION
CAUTION / NOTICE / HINT
HINT:
Use the same procedure for the RH and LH sides.
The procedure listed below is for the LH side.
PROCEDURE
1. CHECK CURTAIN SHIELD AIRBAG ASSEMBLY LH (VEHICLE NOT INVOLVED IN COLLISION)
...
Disassembly
DISASSEMBLY
PROCEDURE
1. REMOVE FRONT NO. 1 LOWER ARM BUSH LH
(a) Using a chisel and hammer, pry the flange of the bush outward.
(b) Using SST and a press, press out the bush.
SST: 09632-36 ...

0.0088